Vue3
学习:B站小满ZS B站尚硅谷
Vue3快速上手 1.Vue3简介
2.Vue3带来了什么 1.性能的提升
打包大小减少41%
初次渲染快55%, 更新渲染快133%
内存减少54%
……
2.源码的升级
3.拥抱TypeScript
4.新的特性
Composition API(组合API)
setup配置
ref与reactive
watch与watchEffect
provide与inject
……
新的内置组件
Fragment
Teleport
Suspense
其他改变
新的生命周期钩子
data 选项应始终被声明为一个函数
移除keyCode支持作为 v-on 的修饰符
……
1、创建Vue3.0工程 1.使用 vue-cli 创建 官方文档:https://cli.vuejs.org/zh/guide/creating-a-project.html#vue-create
1 2 3 4 5 6 7 8 9 cd vue_test
2.使用 vite 创建 官方文档:https://v3.cn.vuejs.org/guide/installation.html#vite
vite官网:https://vitejs.cn
什么是vite?—— 新一代前端构建工具。
优势如下:
开发环境中,无需打包操作,可快速的冷启动。
轻量快速的热重载(HMR)。
真正的按需编译,不再等待整个应用编译完成。
传统构建 与 vite构建对比图
1 2 3 4 5 6 7 8 cd <project-name>
3、Vue3 项目结构 Vue3 中 main.js 代码有所改变:
1 2 3 4 5 6 7 8 import { createApp } from 'vue' import App from './App.vue' const app = createApp (App )mount ('#app' )
Vue3 支持定义多个根节点,组件的 <template> 支持定义多个根节点:
1 2 3 4 <template > <h1 > 根节点</h1 > <h1 > 根节点</h1 > </template >
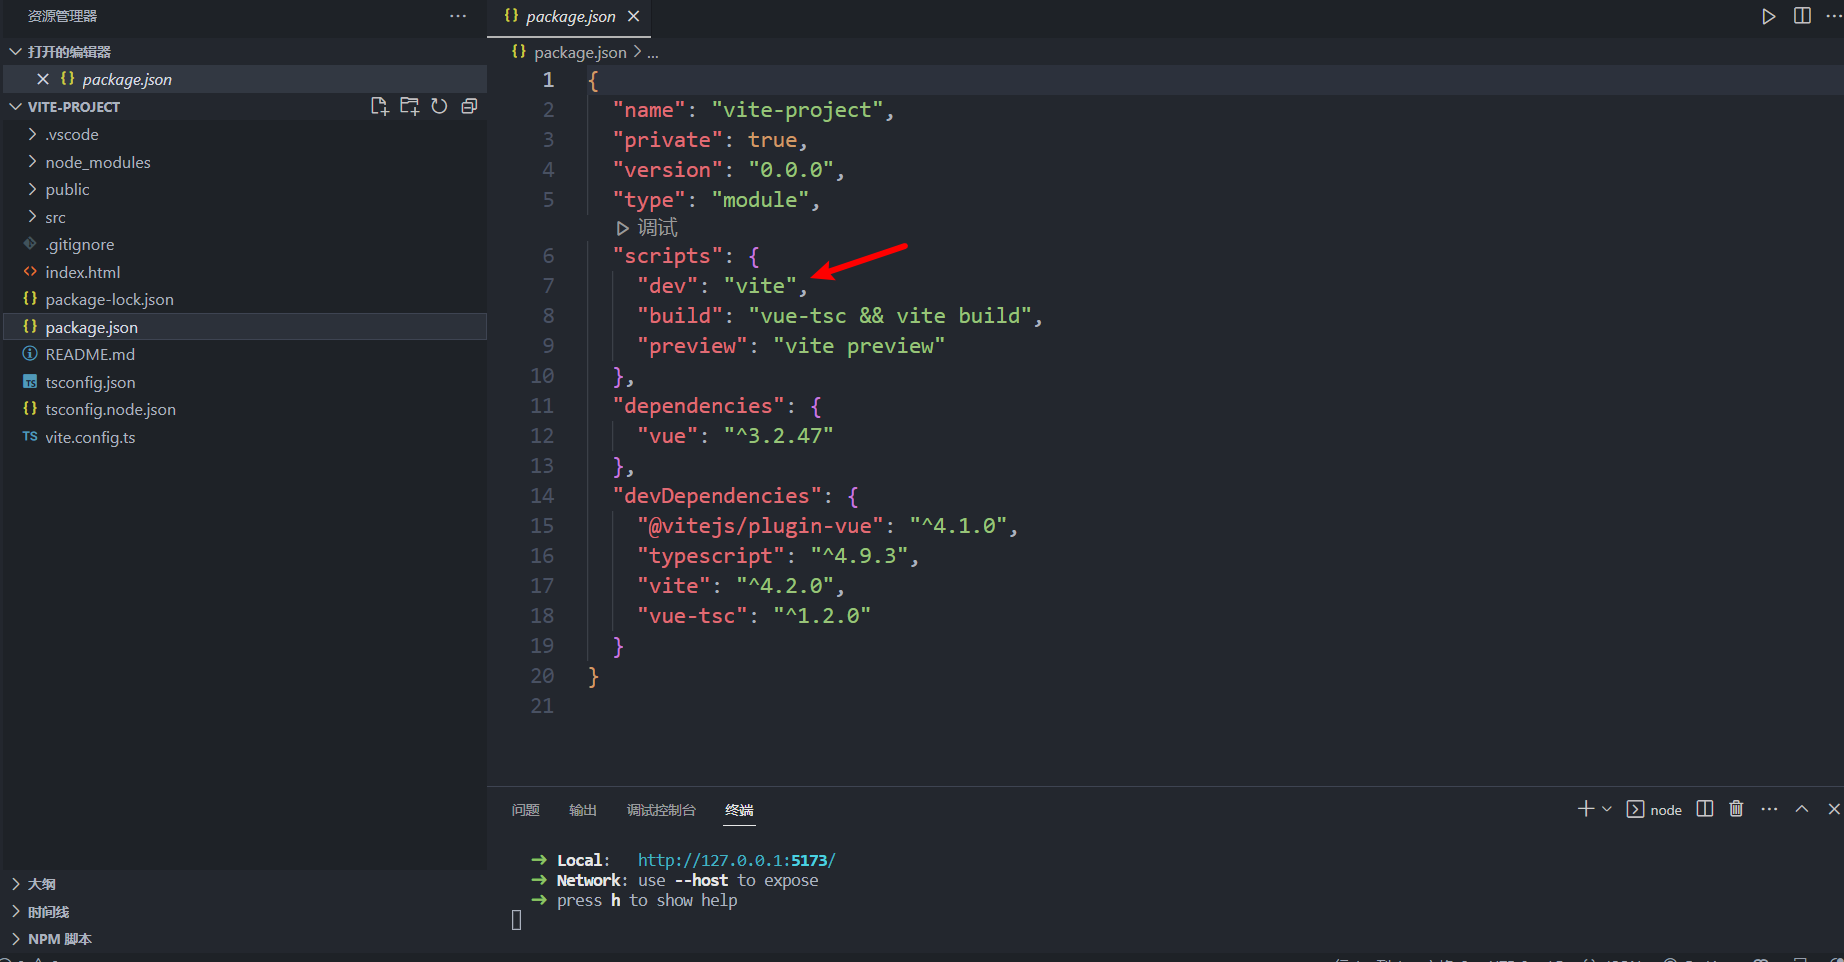
4、npm run dev详解 在我们执行这个命令的时候会去找 package json 的scripts 然后执行对应的dev命令
其实在我们执行npm install 的时候(包含vite) 会在node_modules/.bin/ 创建好可执行文件
.bin 目录,这个目录不是任何一个 npm 包。目录下的文件,表示这是一个个软链接,打开文件可以看到文件顶部写着 #!/bin/sh ,表示这是一个脚本
所以npm run xxx 的时候,就会到 node_modules/bin中找对应的映射文件,然后再找到相应的js文件来执行
1.查找规则是先从当前项目的node_modlue /bin去找,
2.找不到去全局的node_module/bin 去找
3.再找不到 去环境变量去找
2、常用 Composition API 组合式api 官方文档: https://v3.cn.vuejs.org/guide/composition-api-introduction.html
1.拉开序幕的setup
setup 是 Vue3 中一个新的配置项,值为函数
组件中使用的数据、方法等都要配置在 setup 中
setup 函数两种返回值:
返回一个对象,对象中的属性、方法可在模板中直接使用
返回一个渲染函数,可自定义渲染内容
setup 函数的参数:
props:值为对象,包含了组件外部传进来,且组件内部声明接收的属性
context:上下文对象
attrs:值为对象,包含了组件外部传进来,且组件内部没有声明接收的属性,相当于 this.$attrsslots:收到的插槽内容,相当于 this.$slotsemit:触发自定义事件的函数,相当于 this.$emit
1
2
3
4
5
6
7
8
9
10
11
12
13
14
15
16
17
18
19
20
21
22
23
24
25
26
27
28
29
30
import { h } from 'vue' export default {name : 'App' ,props : ['title' ],emits : ['changeCount' ],setup (props, context ) {let name = 'Vue3' function sayHello (function test (emit ('changeCount' , 888 )return {
setup 在 beforeCreate 钩子之前执行,this 为 undefined
setup 不要和 Vue2 配置混用。Vue2 的配置可以访问到 setup 的属性方法,反过来不行;如有重名,setup 优先
setup 不能是 async 函数,因为 async 函数返回的是 promise 不是对象,会导致模板无法访问属性方法
若要返回 promise 实例,需要 Suspense 和异步组件的配合
2.ref函数
作用: 定义一个响应式的数据
语法: const xxx = ref(initValue)
创建一个包含响应式数据的引用对象(reference对象,简称ref对象) 。
JS中操作数据: xxx.value
模板中读取数据: 不需要.value,直接:<div>{{xxx}}</div>
备注:
接收的数据可以是:基本类型、也可以是对象类型 。
基本类型的数据:响应式依然是靠Object.defineProperty()的get与set完成的。
对象类型的数据:内部 “ 求助 ” 了Vue3.0中的一个新函数—— reactive函数。
对象类型数据使用 ES6 的 Proxy 实现响应式,Vue3 把相关操作封装在 reactive 函数中
按照之前的办法,对于对象数据,应该遍历每一层的属性添加 getter 、setter,但 Vue3 使用 Proxy 把内部数据一口气监测了
1 2 <h2 > {{ name }}</h2 > <p > {{ jobInfo.type }}</p >
1
2
3
4
5
6
7
8
9
10
11
12
13
14
15
16
17
18
19
20
21
22
23
24
import { ref } from 'vue' export default {setup (let name = ref ('Vue3' )let jobInfo = ref ({type : 'frontend' ,salary : '40w' ,function changeInfo (value = '鱿鱼丝' value .salary = '50w' return {
3.reactive函数
作用: 定义一个对象类型 的响应式数据(基本类型不要用它,要用ref函数)
语法:const 代理对象= reactive(源对象)接收一个对象(或数组),返回一个代理对象(Proxy的实例对象,简称proxy对象)
reactive定义的响应式数据是“深层次的 ”。
内部基于 ES6 的 Proxy 实现,通过代理对象 操作源对象内部数据进行操作。
reactive proxy 不能直接赋值,否则会破坏响应式对象的
解决方法: 数组可以使用push 加上 解构
添加一个对象,把数组作为一个属性去解决
1
2
3
4
5
6
7
8
9
10
11
12
13
14
15
16
17
18
19
20
21
22
23
24
25
26
27
import { reactive } from 'vue' export default {setup (let person = reactive ({name : 'Vue3' ,sex : 'unknown' ,info : {school : 'Oxford' ,major : 'computer' ,let color = reactive (['red' , 'green' , 'blue' ])function changeInfo (info .major = 'art' 0 ] = 'yellow' return {
4.Vue3.0中的响应式原理 vue2.x的响应式
实现原理:
存在问题:
新增属性、删除属性, 界面不会更新。
直接通过下标修改数组, 界面不会自动更新。
Vue3.0的响应式
1 2 3 4 5 6 7 8 9 10 11 12 13 14 15 16 new Proxy (data, {return Reflect .get (target, prop)return Reflect .set (target, prop, value)return Reflect .deleteProperty (target, prop)name = 'tom'
5.reactive对比ref
从定义数据角度对比:
ref用来定义:基本类型数据 。
reactive用来定义:对象(或数组)类型数据 。
备注:ref也可以用来定义对象(或数组)类型数据 , 它内部会自动通过reactive转为代理对象 。
从原理角度对比:
ref通过Object.defineProperty()的get与set来实现响应式(数据劫持)。
reactive通过使用Proxy 来实现响应式(数据劫持), 并通过Reflect 操作源对象 内部的数据。
从使用角度对比:
ref定义的数据:操作数据需要 .value,读取数据时模板中直接读取不需要 .value。
reactive定义的数据:操作数据与读取数据:均不需要 .value。
6.setup的两个注意点
setup执行的时机
在beforeCreate之前执行一次,this是undefined 。
所以setup拿不到data的数据
setup的参数
props:值为对象,包含:组件外部传递过来,且组件内部声明接收了的属性。
context:上下文对象
attrs: 值为对象,包含:组件外部传递过来,但没有在props配置中声明的属性, 相当于 this.$attrs。
slots: 收到的插槽内容, 相当于 this.$slots。
emit: 分发自定义事件的函数, 相当于 this.$emit。
7.计算属性与监视 1.computed函数
与Vue2.x中computed配置功能一致
写法
1 2 3 4 5 6 7 8 9 10 11 12 13 14 15 16 17 18 19 20 21 22 23 24 25 26 27 28 import {reavtive,computed} from 'vue' setup (let person = reavtive ({firstName : '张' ,lastName : '三' let fullName = computed (()=> {return person.firstName + '-' + person.lastName Person .fullName = computed (()=> {return person.firstName + '-' + person.lastName let fullName = computed ({get (return person.firstName + '-' + person.lastName set (value ){const nameArr = value.split ('-' )firstName = nameArr[0 ]lastName = nameArr[1 ]
2.watch函数
与Vue2.x中watch配置功能一致
两个小“坑”:
监视reactive定义的响应式数据时:oldValue无法正确获取、强制开启了深度监视(deep配置失效)。
监视reactive定义的响应式数据中某个属性时:deep配置有效。
1 2 3 4 5 6 7 8 9 10 11 12 13 14 15 16 17 18 19 20 21 22 23 24 25 26 27 28 29 30 31 32 watch (sum,(newValue,oldValue )=> {console .log ('sum变化了' ,newValue,oldValue)immediate :true })watch ([sum,msg],(newValue,oldValue )=> {console .log ('sum或msg变化了' ,newValue,oldValue)watch (person,(newValue,oldValue )=> {console .log ('person变化了' ,newValue,oldValue)immediate :true ,deep :false }) watch (()=> person.job ,(newValue,oldValue )=> {console .log ('person的job变化了' ,newValue,oldValue)immediate :true ,deep :true }) watch ([()=> person.job ,()=> person.name ],(newValue,oldValue )=> {console .log ('person的job变化了' ,newValue,oldValue)immediate :true ,deep :true })watch (()=> person.job ,(newValue,oldValue )=> {console .log ('person的job变化了' ,newValue,oldValue)deep :true })
3.watchEffect函数
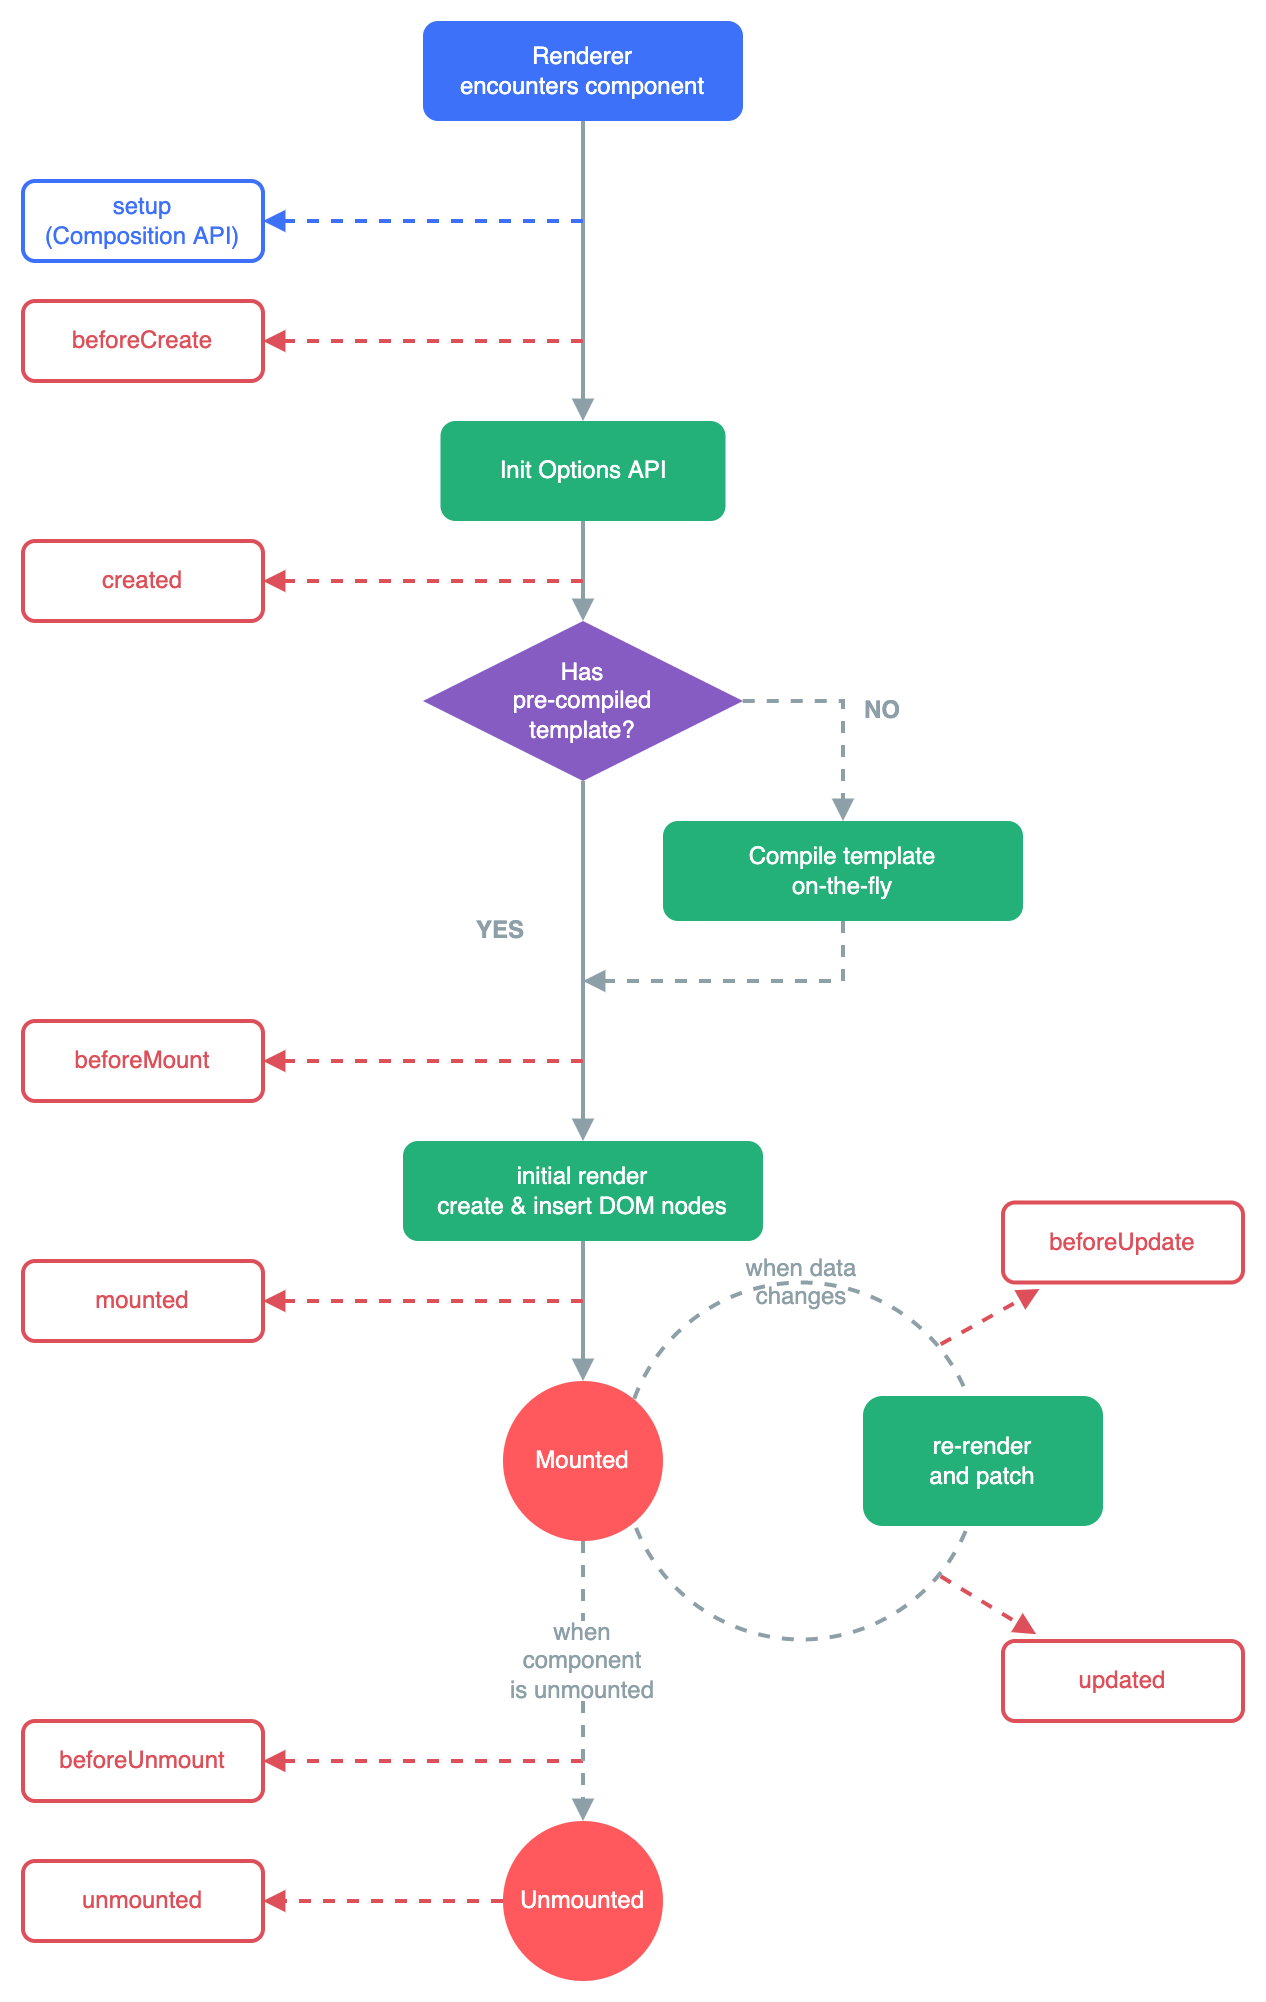
8.生命周期 vue3的生命周期图:
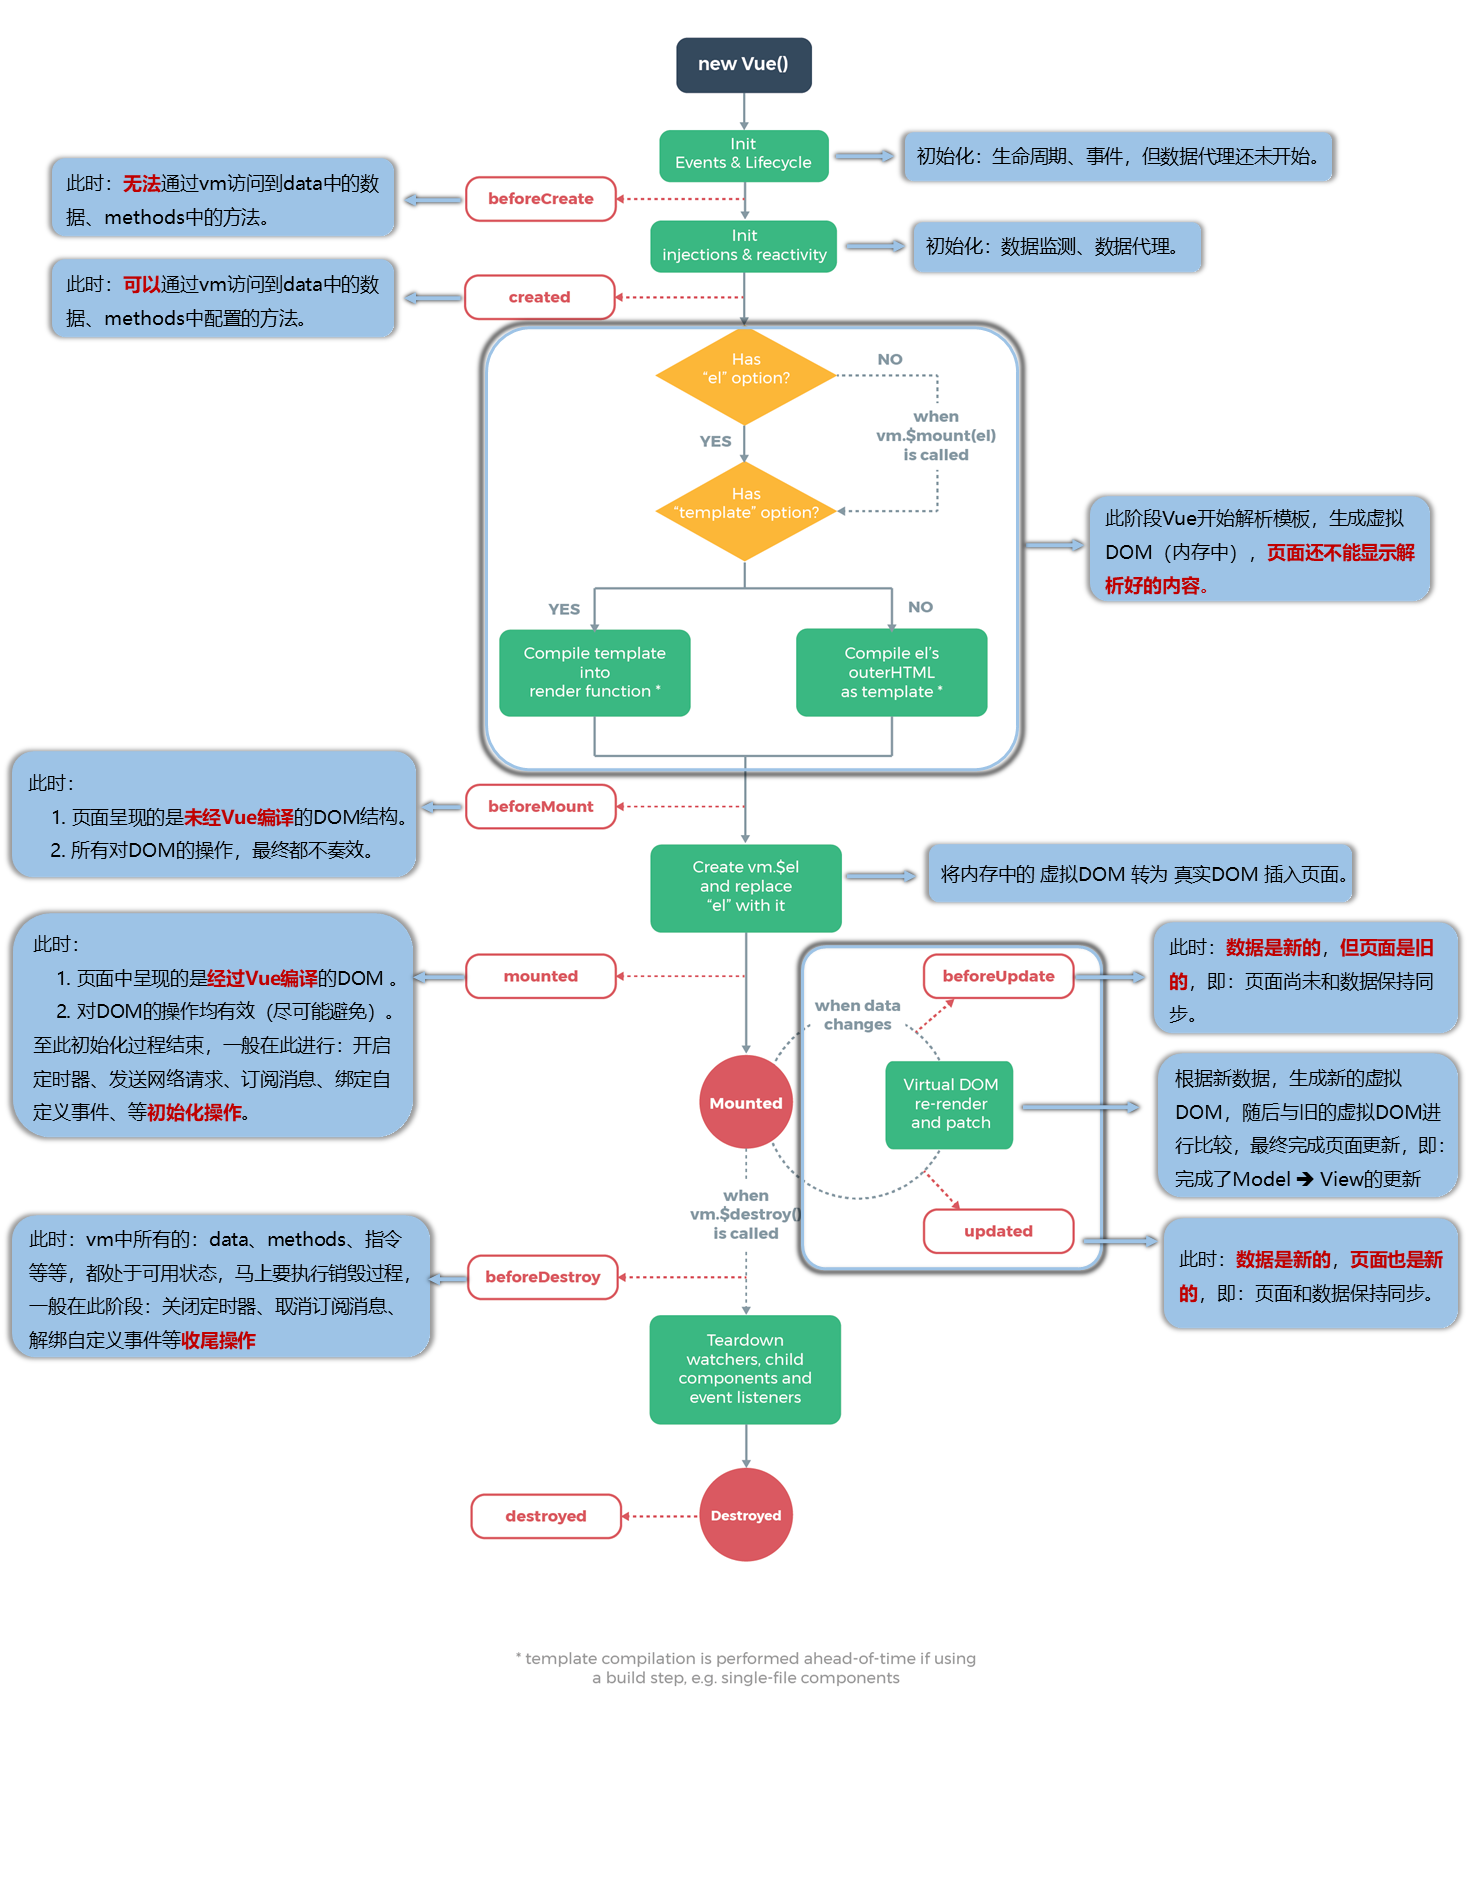
vue2生命周期图:
Vue3.0中可以继续使用Vue2.x中的生命周期钩子,但有有两个被更名:
beforeDestroy改名为 beforeUnmountdestroyed改名为 unmounted
Vue3.0也提供了 Composition API 形式的生命周期钩子,与Vue2.x中钩子对应关系如下:
beforeCreate===>setup()created=======>setup()beforeMount ===>onBeforeMountmounted=======>onMountedbeforeUpdate===>onBeforeUpdateupdated =======>onUpdatedbeforeUnmount ==>onBeforeUnmountunmounted =====>onUnmountedonErrorCaptured =====>注册一个钩子,在捕获了后代组件传递的错误时调用。onRenderTracked =====> 注册一个调试钩子,当组件渲染过程中追踪到响应式依赖时调用。(仅在开发模式下可用)onRenderTriggered =====> 注册一个调试钩子,当响应式依赖的变更触发了组件渲染时调用。(仅在开发模式下可用)onServerPrefetch =====> 注册一个异步函数,在组件实例在服务器上被渲染之前调用。(仅在服务器端渲染期间 可用)
9.自定义hook函数
什么是hook?—— 本质是一个函数,把setup函数中使用的Composition API进行了封装。
类似于vue2.x中的mixin。
自定义hook的优势: 复用代码, 让setup中的逻辑更清楚易懂。
hook 放在 hooks 文件夹中,一个文件对应一个功能模块,以 useXxx 命名
1 2 3 4 5 6 7 8 9 10 11 12 13 14 15 16 17 18 19 20 21 22 23 24 25 26 27 import { reactive, onMounted, onBeforeUnmount } from 'vue' export default function (let point = reactive ({x : 0 ,y : 0 ,function savePoint (event ) {x = event.pageX y = event.pageY onMounted (() => {window .addEventListener ('click' , savePoint)onBeforeUnmount (() => {window .removeEventListener ('click' , savePoint)return point
1 2 3 4 5 6 7 8 9 10 import usePoint from '../hooks/usePoint.js' export default {setup (let point = usePoint ()return { point }
案例 1 2 3 4 5 6 7 8 9 10 11 12 13 14 15 16 17 18 19 20 21 22 23 24 25 26 27 28 29 30 31 32 33 34 35 36 37 import { onMounted } from 'vue' type Options = {el : string type Return = {Baseurl : string | null export default function (option: Options ): Promise <Return > {return new Promise ((resolve ) => {onMounted (() => {const file : HTMLImageElement = document .querySelector (option.el ) as HTMLImageElement ;onload = ():void =>resolve ({Baseurl : toBase64 (file)const toBase64 = (el : HTMLImageElement ): string =>const canvas : HTMLCanvasElement = document .createElement ('canvas' )const ctx = canvas.getContext ('2d' ) as CanvasRenderingContext2D width = el.width height = el.height drawImage (el, 0 , 0 , canvas.width ,canvas.height )console .log (el.width );return canvas.toDataURL ('image/png' )
案例二 自定义指令 + hooks 双管齐下
实现一个监听元素变化的hook
主要会用到一个新的API resizeObserver 兼容性一般 可以做polyfill
但是他可以监听元素的变化 执行回调函数 返回 contentRect 里面有变化之后的宽高。
1 2 3 4 5 6 7 8 9 10 11 12 13 14 15 16 17 18 19 20 21 22 23 24 25 26 import { App , defineComponent, onMounted } from 'vue' function useResize (el: HTMLElement, callback: (cr: DOMRectReadOnly,resize:ResizeObserver) => void ) {let resize : ResizeObserver new ResizeObserver ((entries ) => {for (let entry of entries) {const cr = entry.contentRect ;callback (cr,resize)observe (el)const install = (app: App ) => {directive ('resize' , {mounted (el, binding ) {useResize (el, binding.value )install = installexport default useResize
10.toRef
作用:创建一个 ref 对象,其value值指向另一个对象中的某个属性。
语法:const name = toRef(person,'name')
应用: 要将响应式对象中的某个属性单独提供给外部使用时。
只能修改响应式对象的值
使用场景:解构赋值,解构出来的也是响应式数据
扩展:toRefs 与toRef功能一致,但可以批量创建多个 ref 对象,语法:toRefs(person) 只能拆开
1 2 3 4 5 6 7 8 9 10 11 12 13 14 15 16 17 18 19 20 21 22 import {reactive, toRef, toRefs} from 'vue' setup (let person = reactive ({name : 'Vue3' ,age : 18 ,info : {job : {salary : 40 ,return {name : toRef (person, 'name' ),salary : toRef (person.info .job , 'salary' )toRefs (person)
3、其它 Composition API 1.shallowReactive 与 shallowRef
1 2 3 4 5 6 7 8 9 10 11 12 13 14 15 16 17 18 19 20 import { shallowReactive, shallowRef } from 'vue' setup (let person = shallowReactive ({name : 'Vue3' ,age : 21 ,info : {job : {salary : 22 let x = shallowRef ({y : 0 return {
2.readonly 与 shallowReadonly
readonly: 让一个响应式数据变为只读的(深只读)。
shallowReadonly:让一个响应式数据变为只读的(浅只读)。浅层的数据不可以被修改,可以修改深层的数据
应用场景: 不希望数据被修改时。
1 2 3 4 5 6 7 8 9 10 11 12 setup (let sum = ref (0 )let person = reactive ({...})readonly (sum)shallowReadonly (person)return {
3.toRaw 与 markRaw
toRaw:
作用:将一个由reactive生成的响应式对象 转为普通对象 。
使用场景:用于读取响应式对象对应的普通对象,对这个普通对象的所有操作,不会引起页面更新。
markRaw:
作用:标记一个对象,使其永远不会再成为响应式对象。
应用场景:
有些值不应被设置为响应式的,例如复杂的第三方类库等。
当渲染具有不可变数据源的大列表时,跳过响应式转换可以提高性能。
1 2 3 4 5 6 7 8 9 10 11 12 13 setup (function showRawPerson (const p = toRaw (person);age ++;console .log (p);console .log (person);function addCar (let car = { name : "奔驰" , price : 40 };car = markRaw (car);
4.customRef
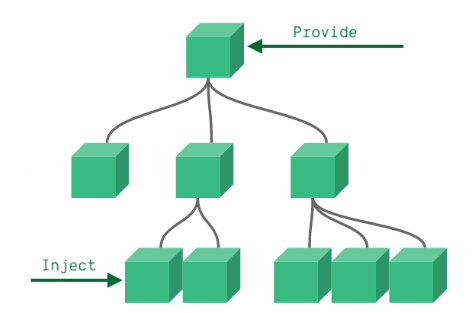
5.provide 与 inject
你如果传递普通的值 是不具有响应式的 需要通过ref reactive 添加响应式
6.响应式数据的判断
isRef: 检查一个值是否为一个 ref 对象
isReactive: 检查一个对象是否是由 reactive 创建的响应式代理
isReadonly: 检查一个对象是否是由 readonly 创建的只读代理
isProxy: 检查一个对象是否是由 reactive 或者 readonly 方法创建的代理
7、父子组件传参 父组件向子组件传值 父组件
1 2 3 4 5 6 7 8 9 <template>
子组件
1 2 3 4 5 6 7 8 9 10 11 12 13 14 15 16 17 18 19 <script setup lang='ts'>
子组件向父组件传值 父组件
1 2 3 4 5 6 7 8 9 10 11 12 13 14 15 16 17 <template>
子组件
1 2 3 4 5 6 7 8 9 10 11 12 13 14 15 16 17 <script setup lang='ts'>
案例 封装瀑布流组件 父组件
1 2 3 4 5 6 7 8 9 10 11 12 13 14 15 16 17 18 19 20 21 22 23 24 25 26 27 28 29 30 31 32 33 34 35 36 37 38 39 40 41 42 43 44 45 46 47 48 49 50 51 52 53 54 55 56 57 58 59 60 61 62 63 64 65 66 67 68 69 70 71 72 73 74 75 76 77 78 79 80 81 82 83 84 85 86 87 88 89 90 91 92 93 94 95 96 97 98 99 100 101 102 103 104 105 106 107 108 109 110 111 112 113 114 115 116 117 118 119 120 121 122 123 124 125 126 127 128 129 130 131 132 133 134 135 136 137 138 139 140 141 142 143 144 145 146 147 148 149 150 151 152 153 154 155 156 157 158 159 160 161 162 163 164 165 166 167 168 169 170 171 172 173 174 175 176 177 178 179 180 181 182 183 184 <template>
子组件
1 2 3 4 5 6 7 8 9 10 11 12 13 14 15 16 17 18 19 20 21 22 23 24 25 26 27 28 29 30 31 32 33 34 35 36 37 38 39 40 41 42 43 44 45 46 47 48 49 50 51 52 53 54 55 56 57 58 59 60 61 62 63 <template>
8、兄弟组件传参和bus 借助父组件传参 例如父组件为App 子组件为A 和 B他两个是同级的
1 2 3 4 5 6 7 8 9 10 11 12 13 14 15 16 17 18 19 <template>
A 组件派发事件通过App.vue 接受A组件派发的事件然后在Props 传给B组件 也是可以实现的
缺点就是比较麻烦 ,无法直接通信,只能充当桥梁
Event Bus 我们在Vue2 可以使用$emit 传递 $on监听 emit传递过来的事件
这个原理其实是运用了JS设计模式 之发布订阅模式
1 2 3 4 5 6 7 8 9 10 11 12 13 14 15 16 17 18 19 20 21 22 23 24 25 26 27 28
然后挂载到Vue config 全局就可以使用啦
注:在vue3当中,$on,$off,$once实例方法已被移除,组件实例不再实现事件触发接口,因此EventBus便无法使用
可以使用Mitt库实现
Mitt 在vue3中$on,$off 和 $once 实例方法已被移除,组件实例不再实现事件触发接口,因此大家熟悉的EventBus便无法使用了。然而我们习惯了使用EventBus,对于这种情况我们可以使用Mitt库(其实就是我们视频中讲的发布订阅模式的设计)
1.安装 2.main.ts 初始化 全局总线,vue 入口文件 main.js 中挂载全局属性
1 2 3 4 5 6 7 8 9 10 11 12 13 14 15 16 17 18 19 20 import { createApp } from 'vue' import App from './App.vue' import mitt from 'mitt' const Mit = mitt ()declare module "vue" {export interface ComponentCustomProperties {$Bus : typeof Mit const app = createApp (App )config .globalProperties .$Bus = Mit mount ('#app' )
3使用方法通过emit派发, on 方法添加事件,off 方法移除,clear 清空所有 A组件派发(emit)
1 2 3 4 5 6 7 8 9 10 11 12 13 14 15 16 17 18 19 20 21 <template>
B组件监听(on)
1 2 3 4 5 6 7 8 9 10 11 12 13 14 15 16 <template>
监听所有事件( on(“*”) )
1 2 3 instance?.proxy ?.$Bus .on ('*' ,(type ,num {console .log (type ,num,'===========>B' )
移除监听事件(off)
1 2 3 4 5 const Fn = (num: any ) => {console .log (num, '===========>B' )proxy ?.$Bus .on ('on-num' ,Fn )proxy ?.$Bus .off ('on-num' ,Fn )
清空所有监听(clear)
1 instance?.proxy ?.$Bus .all .clear ()
9、插槽 插槽就是子组件中的提供给父组件使用的一个占位符,用
匿名插槽 1.在子组件放置一个插槽
1 2 3 4 5 <template>
父组件使用插槽
在父组件给这个插槽填充内容
1 2 3 4 5 <Dialog>
具名插槽 具名插槽其实就是给插槽取个名字。一个子组件可以放多个插槽,而且可以放在不同的地方,而父组件填充内容时,可以根据这个名字把内容填充到对应插槽中
1 2 3 4 5 6 <div>
父组件使用需对应名称
1 2 3 4 5 6 7 8 9 10 11 <Dialog>
插槽简写
1 2 3 4 5 6 7 8 9 10 11 <Dialog>
作用域插槽 在子组件动态绑定参数 派发给父组件的slot去使用
1 2 3 4 5 6 7 8 9 10 <div>
通过结构方式取值
1 2 3 4 5 6 7 8 9 10 11 <Dialog>
动态插槽 插槽可以是一个变量名
1 2 3 4 5 6 7 <Dialog>
10、v-model 在Vue3 v-model 是破坏性更新的
v-model在组件里面也是很重要的
v-model 其实是一个语法糖 通过props 和 emit组合而成的
1.默认值的改变
prop:value -> modelValue;
事件:input -> update:modelValue;
v-bind 的 .sync 修饰符和组件的 model 选项已移除
新增 支持多个v-model
新增 支持自定义 修饰符 Modifiers
案例 子组件
1 2 3 4 5 6 7 8 9 10 11 12 13 14 15 16 17 18 19 20 21 22 23 24 25 26 27 28 29 30 31 32 33 34 35 36 37 38 39 40 41 42 43 44 45 46 47 48 <template>
父组件
1 2 3 4 5 6 7 8 9 10 11 12 13 <template>
绑定多个案例 子组件
1 2 3 4 5 6 7 8 9 10 11 12 13 14 15 16 17 18 19 20 21 22 23 24 25 26 27 28 29 30 31 32 33 34 35 36 37 38 39 40 41 42 43 44 45 46 47 48 49 50 <template>
父组件
1 2 3 4 5 6 7 8 9 10 11 12 13 14 <template>
自定义修饰符 添加到组件 v-model 的修饰符将通过 modelModifiers prop 提供给组件。在下面的示例中,我们创建了一个组件,其中包含默认为空对象的 modelModifiers prop
1 2 3 4 5 6 7 8 9 10 11 12 13 14 15 16 17 18 19 20 21 22 23 24 <script setup lang='ts'>
11、自定义指令directive
属于破坏性更新
1.Vue3指令的钩子函数
created 元素初始化的时候
beforeMount 指令绑定到元素后调用 只调用一次
mounted 元素插入父级dom调用
beforeUpdate 元素被更新之前调用
update 这个周期方法被移除 改用updated
beforeUnmount 在元素被移除前调用
unmounted 指令被移除后调用 只调用一次
Vue2 指令 bind inserted update componentUpdated unbind
2.在setup内定义局部指令 但这里有一个需要注意的限制:必须以 vNameOfDirective 的形式来命名本地自定义指令,以使得它们可以直接在模板中使用。
1 2 3 4 <template>
1 2 3 4 5 6 7 8 9 10 11 12 13 14 15 16 17 18 19 20 21 22 23 24 25 26 27 28 const vMoveDirective : Directive = {created : () => {console .log ("初始化====>" );beforeMount (...args: Array <any > ) {console .log ("初始化一次=======>" );mounted (el: any , dir: DirectiveBinding<Value> ) {style .background = dir.value .background ;console .log ("初始化========>" );beforeUpdate (console .log ("更新之前" );updated (console .log ("更新结束" );beforeUnmount (...args: Array <any > ) {console .log (args);console .log ("======>卸载之前" );unmounted (...args: Array <any > ) {console .log (args);console .log ("======>卸载完成" );
3.生命周期钩子参数详解 第一个 el 当前绑定的DOM 元素
第二个 binding
instance:使用指令的组件实例。
value:传递给指令的值。例如,在 v-my-directive=”1 + 1” 中,该值为 2。
oldValue:先前的值,仅在 beforeUpdate 和 updated 中可用。无论值是否有更改都可用。
arg:传递给指令的参数(如果有的话)。例如在 v-my-directive:foo 中,arg 为 “foo”。
modifiers:包含修饰符(如果有的话) 的对象。例如在 v-my-directive.foo.bar 中,修饰符对象为 {foo: true,bar: true}。
dir:一个对象,在注册指令时作为参数传递。例如,在以下指令中
第三个 当前元素的虚拟DOM 也就是Vnode
第四个 prevNode 上一个虚拟节点,仅在 beforeUpdate 和 updated 钩子中可用
4.函数简写 你可能想在 mounted 和 updated 时触发相同行为,而不关心其他的钩子函数。那么你可以通过将这个函数模式实现
1 2 3 4 5 6 7 8 9 10 11 12 13 14 15 16 17 18 19 20 21 <template>
1.案例自定义拖拽指令 1 2 3 4 5 6 7 8 9 10 11 12 13 14 15 16 17 18 19 20 21 22 23 24 25 26 27 28 29 30 31 32 33 34 35 36 37 38 39 40 41 42 43 44 45 46 47 48 49 50 <template>
2.案例权限按钮 1 2 3 4 5 6 7 8 9 10 11 12 13 14 15 16 17 18 19 20 21 22 23 24 25 26 27 28 29 30 31 32 33 34 35 36 37 38 <template>
3.图片懒加载 1 2 3 4 5 6 7 8 9 10 11 12 13 14 15 16 17 18 19 20 21 22 23 24 25 26 27 28 29 30 31 32 <template>
4、Composition API 的优势 1.Options API 存在的问题 使用传统OptionsAPI中,新增或者修改一个需求,就需要分别在data,methods,computed里修改 。
2.Composition API 的优势 我们可以更加优雅的组织我们的代码,函数。让相关功能的代码更加有序的组织在一起。
5、新的组件 组件 全局组件 在main.ts文件中
1 2 3 import Card from './components/Card.vue' export const app = createApp (App )component ('Card' , Card )
局部组件 1 2 3 4 5 6 7 8 9 10 11 12 13 <template>
递归组件 父组件
1 2 3 4 5 6 7 8 9 10 11 12 13 14 15 16 17 18 19 20 21 22 23 24 25 26 27 28 29 30 31 type TreeList = {name : string ;string ;TreeList [] | [];const data = reactive<TreeList []>([name : "no.1" ,children : [name : "no.1-1" ,children : [name : "no.1-1-1" ,name : "no.2" ,children : [name : "no.2-1" ,name : "no.3" ,
子组件
1 2 3 4 5 6 7 8 9 10 11 12 13 14 type TreeList = {name : string ;string ;TreeList [] | [];type Props <T> = {Props <TreeList >>();const clickItem = (item: TreeList ) => {console .log (item)
子组件增加一个script 定义组件名称为了 递归用
给我们的组件定义名称有好几种方式
1、在增加一个script 通过 export 添加name 1 2 3 4 5 <script lang="ts">
2、直接使用文件名当组件名 3、在script加上name
1 2 3 <script lang="ts" name="TreeItem">
动态组件 1 2 3 4 <component :is="A"></component>
插件 插件是自包含的代码,通常向 Vue 添加全局级功能。你如果是一个对象需要有install方法Vue会帮你自动注入到install 方法 你如果是function 就直接当install 方法去使用
使用插件 在使用 createApp() 初始化 Vue 应用程序后,你可以通过调用 use() 方法将插件添加到你的应用程序中。
实现一个Loading
Loading.Vue 1 2 3 4 5 6 7 8 9 10 11 12 13 14 15 16 17 18 19 20 21 22 23 24 25 26 27 28 29 30 31 32 33 34 35 36 37 38 39 40 <template>
Loading.ts 1 2 3 4 5 6 7 8 9 10 11 12 13 14 15 16 17 import { createVNode, render, VNode , App } from 'vue' ;import Loading from './index.vue' export default {install (app: App ) {const vnode : VNode = createVNode (Loading )render (vnode, document .body )config .globalProperties .$loading = {show : () => vnode.component ?.exposed ?.show (),hide : () => vnode.component ?.exposed ?.hide ()
Main.ts 1 2 3 4 5 6 7 8 9 10 11 12 13 14 15 16 17 18 19 20 import Loading from './components/loading' let app = createApp (App )use (Loading )type Lod = {show : () => void ,hide : () => void declare module '@vue/runtime-core' {export interface ComponentCustomProperties {$loading : Lod mount ('#app' )
使用方法 1 2 3 4 5 6 7 8 9 10 11 12 13 14 15 16 17 18 19 20 21 22 23 <template>
Vue use 源码手写 1 2 3 4 5 6 7 8 9 10 11 12 13 14 15 16 17 import type { App } from 'vue' import { app } from './main' interface Use {install : (app: App, ...options: any [] ) => void const installedList = new Set ()export function MyUse <T extends Use >(plugin : T, ...options : any []) {if (installedList.has (plugin)){return console .warn ('重复添加插件' ,plugin)else {install (app, ...options)add (plugin)
1.Fragment
在Vue2中: 组件必须有一个根标签
在Vue3中: 组件可以没有根标签, 内部会将多个标签包含在一个Fragment虚拟元素中
好处: 减少标签层级, 减小内存占用
2.Teleport
3.Suspense
4.keep-alive 内置组件keep-alive
开启keep-alive 生命周期的变化
初次进入时: onMounted > onActivated
1 2 3 4 5 6 7 8 9 10 11 12 13 14 15 16 17 <!-- 基本 -->
include 和 exclude
1 <keep-alive :include="" :exclude="" :max=""></keep-alive>
include 和 exclude 允许组件有条件地缓存。二者都可以用逗号分隔字符串、正则表达式或一个数组来表示:
max
1 2 3 <keep-alive :max="10">
5.transition动画组件 Vue 提供了 transition 的封装组件,在下列情形中,可以给任何元素和组件添加进入/离开过渡:
条件渲染 (使用 v-if)
条件展示 (使用 v-show)
动态组件
组件根节点
自定义 transition 过度效果,你需要对transition组件的name属性自定义。并在css中写入对应的样式
1.过渡的类名 在进入/离开的过渡中,会有 6 个 class 切换。
#过渡 class
v-enter-from:定义进入过渡的开始状态。在元素被插入之前生效,在元素被插入之后的下一帧移除。
v-enter-active:定义进入过渡生效时的状态。在整个进入过渡的阶段中应用,在元素被插入之前生效,在过渡/动画完成之后移除。这个类可以被用来定义进入过渡的过程时间,延迟和曲线函数。
v-enter-to:定义进入过渡的结束状态。在元素被插入之后下一帧生效 (与此同时 v-enter-from 被移除),在过渡/动画完成之后移除。
v-leave-from:定义离开过渡的开始状态。在离开过渡被触发时立刻生效,下一帧被移除。
v-leave-active:定义离开过渡生效时的状态。在整个离开过渡的阶段中应用,在离开过渡被触发时立刻生效,在过渡/动画完成之后移除。这个类可以被用来定义离开过渡的过程时间,延迟和曲线函数。
v-leave-to:离开过渡的结束状态。在离开过渡被触发之后下一帧生效 (与此同时 v-leave-from 被移除),在过渡/动画完成之后移除。
如下
<button @click='flag = !flag'>切换</button>
<transition name='fade'>
<div v-if='flag' class="box"></div>
</transition>
1 2 3 4 5 6 7 8 9 10 11 12 13 14 15 16 17 18 19 20 21 22 23 24 25 26 27 28 29 30 31 32 //开始过度.fade-enter-from {background :red;width :0px ;height :0px ;transform :rotate (360deg ).fade-enter-active {transition : all 2.5s linear;.fade-enter-to {background :yellow;width :200px ;height :200px ;.fade-leave-from {width :200px ;height :200px ;transform :rotate (360deg ).fade-leave-active {transition : all 1s linear;.fade-leave-to {width :0px ;height :0px ;
2.自定义过渡 class 类名 trasnsition props
enter-from-class
enter-active-class
enter-to-class
leave-from-class
leave-active-class
leave-to-class
自定义过度时间 单位毫秒
你也可以分别指定进入和离开的持续时间:
1 2 3 4 <transition :duration ="1000" > ...</transition > <transition :duration =" { enter: 500, leave: 800 } " ></transition >
通过自定义class 结合css动画库animate css
安装库 npm install animate.css
引入 import ‘animate.css’
使用方法
官方文档 Animate.css | A cross-browser library of CSS animations.
<transition
leave-active-class="animate__animated animate__bounceInLeft"
enter-active-class="animate__animated animate__bounceInRight"
>
<div v-if="flag" class="box"></div>
</transition>
3.transition 生命周期8个 1 2 3 4 5 6 7 8 @before -enter="beforeEnter" @enter ="enter" @after -enter="afterEnter" @enter -cancelled="enterCancelled" @before -leave="beforeLeave" @leave ="leave" @after -leave="afterLeave" @leave -cancelled="leaveCancelled"
当只用 JavaScript 过渡的时候,在 enter 和 leave 钩子中必须使用 done 进行回调
结合gsap 动画库使用 GreenSock
1 2 3 4 5 6 7 8 9 10 11 12 const beforeEnter = (el: Element ) => {console .log ('进入之前from' , el);const Enter = (el: Element,done:Function ) => {console .log ('过度曲线' );setTimeout (()=> {done ()3000 )const AfterEnter = (el: Element ) => {console .log ('to' );
4.appear 通过这个属性可以设置初始节点过度 就是页面加载完成就开始动画 对应三个状态
1 2 3 4 appear-active-class = "" appear-from-class = "" appear-to-class = ""
6.transition-group过度列表
一般配合v-for使用
那么怎么同时渲染整个列表,比如使用 v-for?在这种场景下,我们会使用 组件。在我们深入例子之前,先了解关于这个组件的几个特点:
默认情况下,它不会渲染一个包裹元素,但是你可以通过 tag attribute 指定渲染一个元素。
过渡模式不可用,因为我们不再相互切换特有的元素。
内部元素总是需要提供唯一的 key attribute 值。
CSS 过渡的类将会应用在内部的元素中,而不是这个组/容器本身。
1 2 3 <transition-group>
1 2 3 4 5 6 7 const list = reactive<number []>([1 , 2 , 4 , 5 , 6 , 7 , 8 , 9 ])const Push = (push (123 )const Pop = (pop ()
2.列表的移动过渡 <transition-group> 组件还有一个特殊之处。除了进入和离开,它还可以为定位的改变添加动画。只需了解新增的 v-move 类就可以使用这个新功能,它会应用在元素改变定位的过程中。像之前的类名一样,它的前缀可以通过 name attribute 来自定义,也可以通过 move-class attribute 手动设置
下面代码很酷炫
1 2 3 4 5 6 7 8 9 10 11 12 13 14 15 16 17 18 19 20 21 22 23 24 25 26 27 28 29 30 31 32 33 34 35 36 37 38 39 40 41 42 43 <template>
3.状态过渡 Vue 也同样可以给数字 Svg 背景颜色等添加过度动画 今天演示数字变化
1 2 3 4 5 6 7 8 9 10 11 12 13 14 15 16 17 18 19 20 21 22 23 24 25 26 <template>
6、其他 1.全局API的转移
Vue 2.x 有许多全局 API 和配置。
例如:注册全局组件、注册全局指令等。
1 2 3 4 5 6 7 8 9 10 11 12 Vue .component ('MyButton' , {data : () => ({count : 0 template : '<button @click="count++">Clicked {{ count }} times.</button>' Vue .directive ('focus' , {inserted : el =>focus ()
Vue3.0中对这些API做出了调整:
2.其他改变
可选链操作符 双问号表达式 1 2 3 4 5 6 7 8 ?length undefined 不会报错length ?? []null 和undefined ,然后返回 ?? 后面的数据
Scoped和样式穿透 主要是用于修改很多vue常用的组件库(element, vant, AntDesigin),虽然配好了样式但是还是需要更改其他的样式
就需要用到样式穿透
vue中的scoped 通过在DOM结构以及css样式上加唯一不重复的标记:data-v-hash的方式,以保证唯一(而这个工作是由过PostCSS转译实现的),达到样式私有化模块化的目的。
总结一下scoped三条渲染规则:
给HTML的DOM节点加一个不重复data属性(形如:data-v-123)来表示他的唯一性
在每句css选择器的末尾(编译后的生成的css语句)加一个当前组件的data属性选择器(如[data-v-123])来私有化样式
如果组件内部包含有其他组件,只会给其他组件的最外层标签加上当前组件的data属性
PostCSS会给一个组件中的所有dom添加了一个独一无二的动态属性data-v-xxxx,然后,给CSS选择器额外添加一个对应的属性选择器来选择该组件中dom,这种做法使得样式只作用于含有该属性的dom——组件内部dom, 从而达到了’样式模块化’的效果.
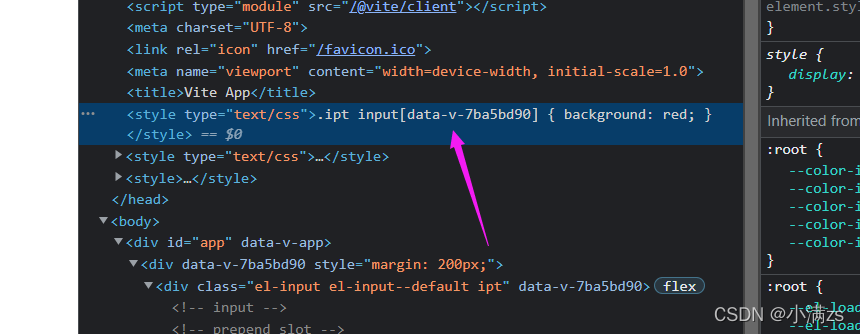
案例修改Element ui Input样式
发现没有生效
如果不写Scoped 就没问题
原因就是Scoped 搞的鬼 他在进行PostCss转化的时候把元素选择器默认放在了最后
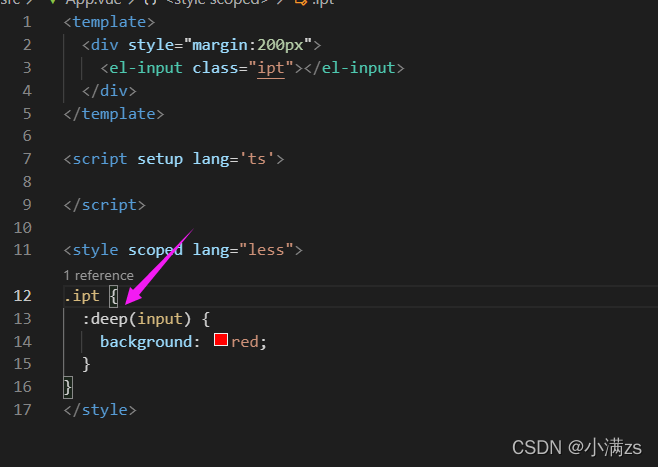
Vue 提供了样式穿透:deep() 他的作用就是用来改变 属性选择器的位置
css style 1.插槽选择器 A 组件定义一个插槽
1 2 3 4 5 6 7 8 9 10 11 12 13 14 <template>
在App.vue 引入
1 2 3 4 5 6 7 8 9 10 11 12 13 14 15 <template>
在A组件修改class a 的颜色
1 2 3 4 5 <style scoped > .a { color :red } </style >
默认情况下,作用域样式不会影响到 <slot/> 渲染出来的内容,因为它们被认为是父组件所持有并传递进来的。
解决方案 slotted
1 2 3 4 5 <style scoped>:slotted (.a ) {color :red
2.全局选择器 在之前我们想加入全局 样式 通常都是新建一个style 标签 不加scoped 现在有更优雅的解决方案
1 2 3 4 5 6 7 8 9 <style>
1 2 3 4 5 <style lang="less" scoped>
效果等同于上面
3.动态 CSS 单文件组件的 <style> 标签可以通过 v-bind 这一 CSS 函数将 CSS 的值关联到动态的组件状态上:
1 2 3 4 5 6 7 8 9 10 11 12 13 14 15 16 17 <template>
如果是对象 v-bind 请加引号
1 2 3 4 5 6 7 8 9 10 11 12 13 14 15 16 17 18 <template>
4.css module <style module> 标签会被编译为 CSS Modules 并且将生成的 CSS 类作为 $style 对象的键暴露给组件
1 2 3 4 5 6 7 8 9 10 11 12 <template > <div :class ="$style.red" > </div > </template > <style module > .red { color : red; font-size : 20px ; } </style >
自定义注入名称(多个可以用数组)
你可以通过给 module attribute 一个值来自定义注入的类对象的 property 键
1 2 3 4 5 6 7 8 9 10 11 12 13 14 15 <template>
与组合式 API 一同使用
注入的类可以通过 useCssModule API 在 setup() 和 <script setup> 中使用。对于使用了自定义注入名称的 <style module> 模块,useCssModule 接收一个对应的 module attribute 值作为第一个参数
1 2 3 4 5 6 7 8 9 10 11 12 13 14 15 16 17 18 19 20 21 <template>
tsx 我们之前呢是使用Template去写我们模板。现在可以扩展另一种风格TSX 风格
vue2 的时候就已经支持jsx 写法,只不过不是很友好,随着vue3对typescript的支持度,tsx写法越来越被接受
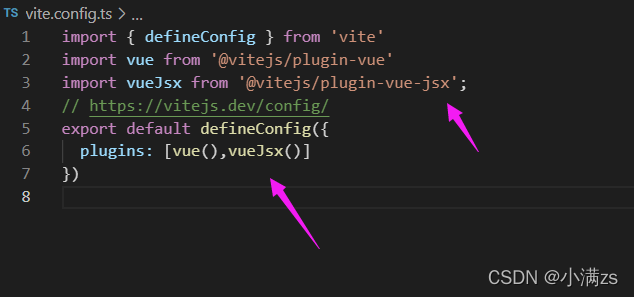
1.安装插件 npm install @vitejs/plugin-vue-jsx -D
vite.config.ts 配置
1 2 3 4 5 6 7 import { defineConfig } from 'vite' import vue from '@vitejs/plugin-vue' import vueJsx from '@vitejs/plugin-vue-jsx' ;export default defineConfig ({plugins : [vue (),vueJsx ()]
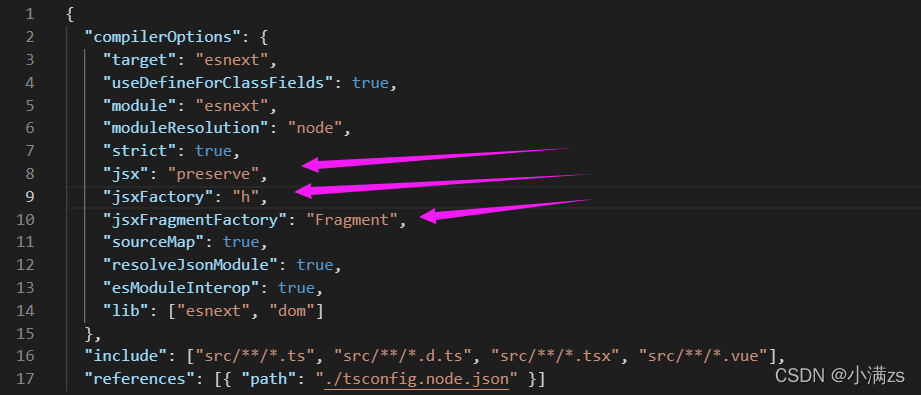
2.修改tsconfig.json 配置文件 1 2 3 "jsx" : "preserve" , "jsxFactory" : "h" , "jsxFragmentFactory" : "Fragment" ,
配置完成就可以使用啦
在目录新建一个xxxxxx.tsx文件
3.使用TSX TIPS tsx不会自动解包使用ref加.vlaue ! ! !
tsx支持 v-model 的使用 1 2 3 4 5 6 7 8 9 10 11 12 13 14 15 16 17 import { ref } from 'vue' let v = ref<string >('' )const renderDom = (return (<> <input v-model ={v.value} type ="text" /> <div > {v.value} </div > </> export default renderDom
v-show 1 2 3 4 5 6 7 8 9 10 11 12 13 14 15 import { ref } from 'vue' let flag = ref (false )const renderDom = (return (<> <div v-show ={flag.value} > 景天</div > <div v-show ={!flag.value} > 雪见</div > </> export default renderDom
v-if是不支持的 所以需要改变风格
1 2 3 4 5 6 7 8 9 10 11 12 13 14 15 import { ref } from 'vue' let flag = ref (false )const renderDom = (return (<> { flag.value ? <div > 景天</div > : <div > 雪见</div > } </> export default renderDom
v-for也是不支持的 需要使用Map
1 2 3 4 5 6 7 8 9 10 11 12 13 14 15 16 17 import { ref } from 'vue' let arr = [1 ,2 ,3 ,4 ,5 ]const renderDom = (return (<> { arr.map(v=>{ return <div > ${v}</div > }) } </> export default renderDom
v-bind使用 直接赋值就可以
1 2 3 4 5 6 7 8 9 10 11 12 13 import { ref } from 'vue' let arr = [1 , 2 , 3 , 4 , 5 ]const renderDom = (return (<> <div data-arr ={arr} > 1</div > </> export default renderDom
v-on绑定事件 所有的事件都按照react风格来
1 2 3 4 5 6 7 8 9 10 11 12 13 14 const renderDom = (return (<> <button onClick ={clickTap} > 点击</button > </> const clickTap = (console .log ('click' );export default renderDom
Props 接受值 1 2 3 4 5 6 7 8 9 10 11 12 13 14 15 16 17 18 19 20 21 import { ref } from 'vue' type Props = {title :string const renderDom = (props:Props ) => {return (<> <div > {props.title}</div > <button onClick ={clickTap} > 点击</button > </> const clickTap = (console .log ('click' );export default renderDom
Emit派发 1 2 3 4 5 6 7 8 9 10 11 12 13 14 15 16 17 type Props = {title : string const renderDom = (props: Props,content:any ) => {return (<> <div > {props.title}</div > <button onClick ={clickTap.bind(this,content)} > 点击</button > </> const clickTap = (ctx:any ) => {emit ('on-click' ,1 )
Slot 1 2 3 4 5 6 7 8 9 10 11 12 13 14 15 16 17 18 19 20 21 22 23 24 25 26 27 28 29 30 31 32 33 34 35 36 37 38 39 40 41 42 43 44 45 46 47 48 const A = (props, { slots } ) => (<> <h1 > { slots.default ? slots.default() : 'foo' }</h1 > <h2 > { slots.bar?.() }</h2 > </> const App = {setup (const slots = {bar : () => <span > B</span > return () => (<A v-slots ={slots} > <div > A</div > </A > const App = {setup (const slots = {default : () => <div > A</div > bar : () => <span > B</span > return () => <A v-slots ={slots} /> const App = {setup (return () => (<> <A > {{ default: () => <div > A</div > , bar: () => <span > B</span > , }} </A > <B > {() => "foo"}</B > </>
Event Loop 和 nextTick JS 执行机制 在我们学js 的时候都知道js 是单线程的如果是多线程的话会引发一个问题在同一时间同时操作DOM 一个增加一个删除JS就不知道到底要干嘛了,所以这个语言是单线程的但是随着HTML5到来js也支持了多线程webWorker 但是也是不允许操作DOM
单线程就意味着所有的任务都需要排队,后面的任务需要等前面的任务执行完才能执行,如果前面的任务耗时过长,后面的任务就需要一直等,一些从用户角度上不需要等待的任务就会一直等待,这个从体验角度上来讲是不可接受的,所以JS中就出现了异步的概念。
同步任务 代码从上到下按顺序执行
异步任务 1.宏任务 script(整体代码)、setTimeout、setInterval、UI交互事件、postMessage、Ajax
2.微任务 Promise.then catch finally、MutaionObserver、process.nextTick(Node.js 环境)
运行机制 所有的同步任务都是在主进程执行的形成一个执行栈,主线程之外,还存在一个”任务队列”,异步任务执行队列中先执行宏任务,然后清空当次宏任务中的所有微任务,然后进行下一个tick如此形成循环。
nextTick 就是创建一个异步任务,那么它自然要等到同步任务执行完成后才执行。
1 2 3 4 5 6 7 8 9 10 11 12 13 14 15 16 17 18 19 20 21 22 23 24 25 26 <template>
nextTick 接受一个参数fn(函数)定义了一个变量P 这个P最终返回都是Promise,最后是return 如果传了fn 就使用变量P.then执行一个微任务去执行fn函数,then里面this 如果有值就调用bind改变this指向返回新的函数,否则直接调用fn,如果没传fn,就返回一个promise,最终结果都会返回一个promise
在我们之前讲过的ref源码中有一段 triggerRefValue 他会去调用 triggerEffects
1 2 3 4 5 6 7 8 9 10 11 12 13 14 15 export function triggerRefValue (ref: RefBase<any >, newVal?: any ) {toRaw (ref)if (ref.dep ) {if (__DEV__) {triggerEffects (ref.dep , {target : ref,type : TriggerOpTypes .SET ,key : 'value' ,newValue : newValelse {triggerEffects (ref.dep )
1 2 3 4 5 6 7 8 9 10 11 12 13 14 15 16 17 18 19 export function triggerEffects ( dep: Dep | ReactiveEffect[], debuggerEventExtraInfo?: DebuggerEventExtraInfo for (const effect of isArray (dep) ? dep : [...dep]) {if (effect !== activeEffect || effect.allowRecurse ) {if (__DEV__ && effect.onTrigger ) {onTrigger (extend ({ effect }, debuggerEventExtraInfo))if (effect.scheduler ) {scheduler ()else {run ()
那么scheduler 这个函数从哪儿来的 我们看这个类 ReactiveEffect
1 2 3 4 5 6 7 8 9 10 11 12 13 14 15 16 17 18 19 20 21 22 23 24 25 26 27 28 export class ReactiveEffect <T = any > {true deps : Dep [] = []parent : ReactiveEffect | undefined = undefined ComputedRefImpl <T>boolean () => void (event: DebuggerEvent ) => void (event: DebuggerEvent ) => void constructor ( public fn: () => T, public scheduler: EffectScheduler | null = null , scope?: EffectScope ) {recordEffectScope (this , scope)
scheduler 作为一个参数传进来的
1 2 3 4 5 const effect = (instance.effect = new ReactiveEffect (() => queueJob (instance.update ),scope
他是在初始化 effect 通过 queueJob 传进来的
1 2 3 4 5 6 7 8 9 10 11 12 13 14 15 16 17 18 19 20 21 22 23 24 25 26 27 28 29 30 31 32 33 34 export function queueJob (job: SchedulerJob ) {if (length ||includes (allowRecurse ? flushIndex + 1 : flushIndexif (job.id == null ) {push (job)else {splice (findInsertionIndex (job.id ), 0 , job)queueFlush ()function queueFlush (if (!isFlushing && !isFlushPending) {true then (flushJobs)
queueFlush 给每一个队列创建了微任务
如何去理解Tick
vue更新dom是异步的,数据更新是同步的
当我们操作dom的时候发现数据获取的是上次的,就需要使用nextTick
例如我们显示器是60FPS
那浏览器绘制一帧就是1000 / 60 ≈ 16.6ms
那浏览器这一帧率做了什么
1.处理用户的事件,就是event 例如 click,input change 等。
2.执行定时器任务
3.执行 requestAnimationFrame 动画
4.执行dom 的回流与重绘
5.计算更新图层的绘制指令
6.绘制指令合并主线程 如果有空余时间会执行 requestidlecallback
所以 一个Tick 就是去做了这些事
1 2 3 4 5 6 7 8 9 10 11 12 13 14 15 16 17 18 19 20 21 22 23 24 25 26 27 28 29 30 31 32 33 34 35 36 37 38 39 40 41 42 43 44 45 46 47 48 49 50 51 52 53 54 55 56 57 58 59 60 61 62 63 64 65 66 67 68 69 70 71 72 73 74 75 76 77 78 79 80 81 82 83 84 85 86 87 88 89 90 91 92 93 94 95 96 97 98 99 100 101 102 103 104 105 106 107 108 109 110 <template>
vue开发移动&打包APP unocss原子化 什么是css原子化?
1.减少了css体积,提高了css复用
2.减少起名的复杂度
3.增加了记忆成本 将css拆分为原子之后,你势必要记住一些class才能书写,哪怕tailwindcss提供了完善的工具链,你写background,也要记住开头是bg
常见库
lodash
gsap
Mitt — Bus
unplugin-auto-import — 自动引入ref之类的
vueuse
Tailwind CSS