DOM BOM js组成 ECMAScript(JavaScript语句)
DOM(页面文档对象模型)
BOM(浏览器对象模型)
API API是一些预先定义的函数,目的是提供应用程序与开发人员基于某软件或硬件得以访问一组例程的能力,而有无需访问源码,或理解内部工作机制的细节。
简单理解: API是给程序员提供的一种工具,以便能更轻松的实现想要完成的功能。
Web API Web API是浏览器提供的一套操作浏览器功能和页面元素的API(BOM和DOM)
总结:
API是为我们程序员提供的一个接口,帮助我们实现某种功能,我们会使用就可以了,不必纠结内部如何实现
Web API主要是针对于浏览器提供的接口,主要针对于浏览器做交互效果
Web API一般都有输入和输出(函数的传参和返回值),Web API很多都是方法(函数)
学习Web API可以结合前面学习内置对象方法的思路学习
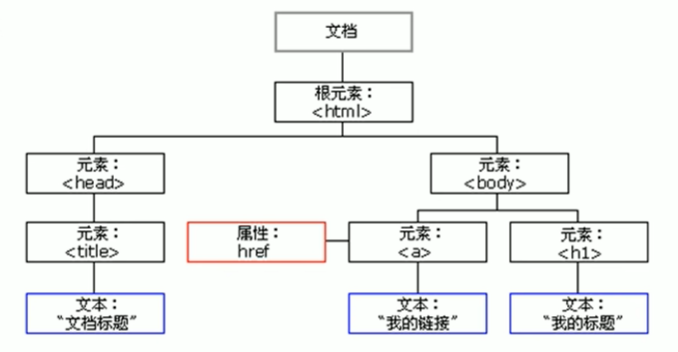
DOM 1、简介 文档对象模型,是W3C组织推荐的处理可扩展标记语言(HTML或者XML)的标准编程接口。
通过这些DOM接口可以改变网页的内容、结构和样式。
DOM树
文档:一个页面就是一个文档,DOM中使用document表示
元素:页面中的所有标签都是元素,DOM中使用element表示
节点:网页中的所有内容都是节点(标签、属性、文本、注释等),DOM中使用node表示
2、获取元素 1、根据ID获取 get–获得,element–元素,by–通过,驼峰命名法
使用
1 var a = document .getElementById ('id' );
返回一个匹配特定ID的元素。参数 id 是大小写敏感的字符串,返回的是一个元素对象
1 2 3 4 5 6 7 8 9 10 11 12 13 14 15 16 17 18 19 20 21 22 23 <!DOCTYPE html > <html lang ="en" > <head > <meta charset ="UTF-8" > <meta http-equiv ="X-UA-Compatible" content ="ie=edge" > <meta name ="viewport" content ="width=device-width, initial-scale=1.0" > <title > Document</title > </head > <body > <div id ="time" > 2019-9-9</div > <script > var timer = document .getElementById ('time' ); console .log (timer); console .log (typeof timer); console .dir (timer); </script > </body > </html >
2、根据标签名获取 使用getElementsByTagName() 方法可以返回带有指定标签名的对象的集合
返回的是 获取过来元素对象的集合,以伪数组的形式存储
1 var a = document.getElementsByTagName('标签名');
注意:
1、因为得到的是一个对象的结合,所以我们想要操作里面的元素就需要遍历
2、得到元素对象是动态的
还可以获取某个元素(父元素) 内部所以指定标签名的子元素
1 element.getElementsByTagName('标签名');
注意:
父元素必须是单个对象(必须指明是哪一个元素对象),获取的时候不包括父元素自己
1 2 3 4 5 6 7 8 9 10 11 12 13 14 15 16 17 18 19 20 21 22 23 24 25 26 27 28 29 30 31 32 33 34 35 36 37 <!DOCTYPE html > <html lang ="en" > <head > <meta charset ="UTF-8" > <meta http-equiv ="X-UA-Compatible" content ="IE=edge" > <meta name ="viewport" content ="width=device-width, initial-scale=1.0" > <title > Document</title > </head > <body > <ul > <li > 我喜欢你</li > <li > 我喜欢你</li > <li > 我喜欢你</li > <li > 我喜欢你</li > </ul > <ol id = 'ol' > <li > 没有结果</li > <li > 没有结果</li > <li > 没有结果</li > <li > 没有结果</li > </ol > <script > var lis = document .getElementsByTagName ('li' ); console .log (lis); console .log (lis[0 ]); var ol = document .getElementById ('ol' ); console .log (ol.getElementsByTagName ('li' )); </script > </body > </html >
3、H5新增获取元素方式 1 2 3 4 5 6 7 8 9 10 11 12 13 14 15 16 17 18 19 20 21 22 23 24 25 26 27 28 29 30 31 32 33 34 35 36 37 38 39 40 document.getElementsByClassName('类名'); //根据类名返回元素对象集合<!DOCTYPE html > <html lang ="en" > <head > <meta charset ="UTF-8" > <meta http-equiv ="X-UA-Compatible" content ="IE=edge" > <meta name ="viewport" content ="width=device-width, initial-scale=1.0" > <title > Document</title > </head > <body > <div class ="box" > 盒子1</div > <div class ="box" > 盒子2</div > <div id ="nav" > <ul > <li > 首页</li > <li > 产品</li > </ul > </div > <script > var boxs = document .getElementsByClassName ('box' ); console .log (boxs); var firstBox = document .querySelector ('.box' ); console .log (firstBox); var nav = document .querySelector ('#nav' ); console .log (nav); var li = document .querySelector ('li' ); console .log (li); var allBox = document .querySelectorAll ('.box' ); console .log (allBox); var lis = document .querySelectorAll ('li' ); console .log (lis); </script > </body > </html >
4、获取特殊元素 1 2 3 4 5 6 7 8 9 10 11 12 13 14 15 16 17 18 19 <!DOCTYPE html > <html lang ="en" > <head > <meta charset ="UTF-8" > <meta http-equiv ="X-UA-Compatible" content ="IE=edge" > <meta name ="viewport" content ="width=device-width, initial-scale=1.0" > <title > Document</title > </head > <body > <script > var bodyEle = document .body ; console .dir (bodyEle); var htmlEle = document .documentElement ; console .log (htmlEle); </script > </body > </html >
3、事件基础 JavaScript使我们有能力创建动态页面,而事件是可以被JavaScript侦测到的行为
简单理解 触发 – 响应机制
网页中的每个元素都可以产生某些可以触发JavaScript的事件,例如,我们可以在用户点击某按钮时产生一个事件,如何去执行某些操作
1 2 3 4 5 6 7 8 9 10 11 12 13 14 15 16 17 18 19 20 21 22 23 <!DOCTYPE html > <html lang ="en" > <head > <meta charset ="UTF-8" > <meta http-equiv ="X-UA-Compatible" content ="IE=edge" > <meta name ="viewport" content ="width=device-width, initial-scale=1.0" > <title > Document</title > </head > <body > <button id ="btn" > 铠甲合体</button > <script > var btn = document .getElementById ('btn' ); btn.onclick = function ( alert ('炎龙铠甲合体成功!' ); } </script > </body > </html >
执行事件的步骤
1、获取事件源
2、注册事件(绑定事件)
3、添加事件处理程序(采取函数赋值形式)
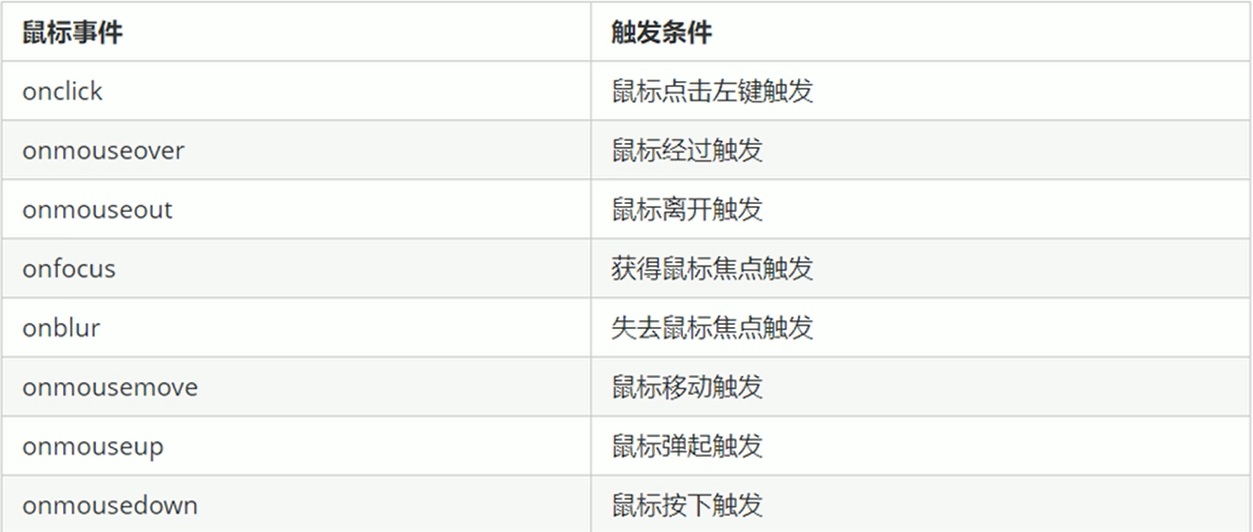
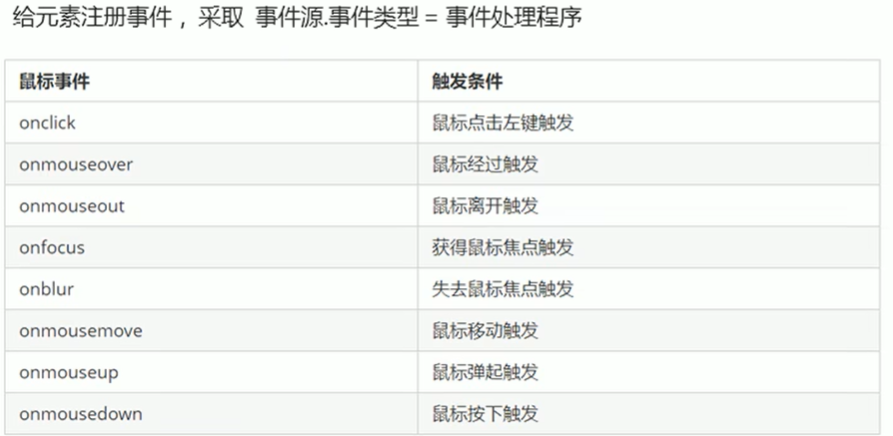
常见的鼠标事件
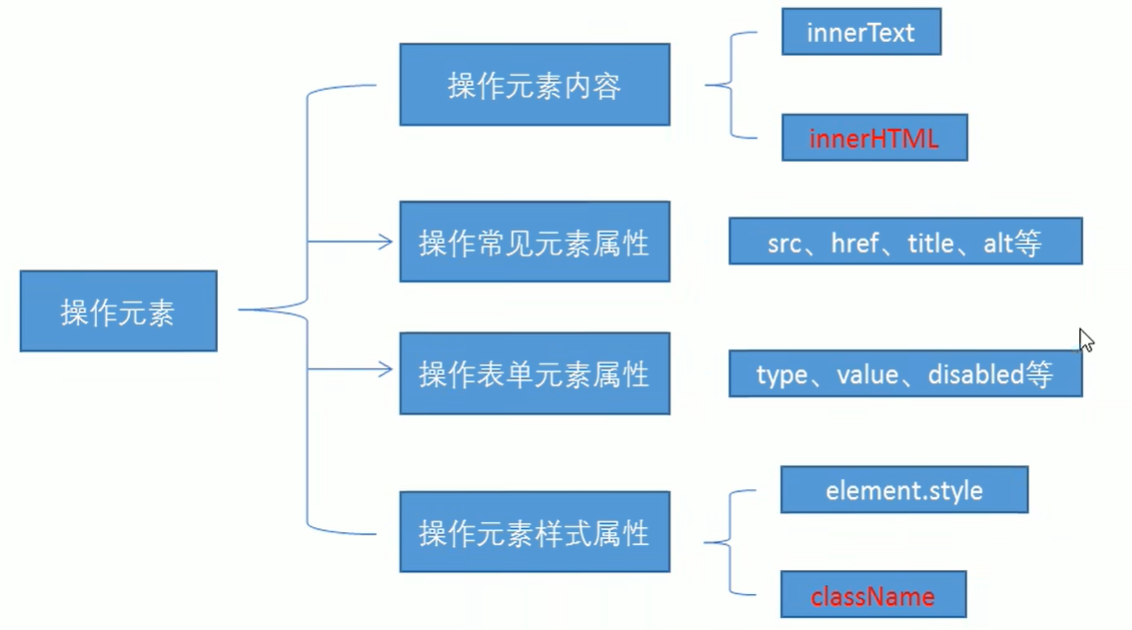
4、操作元素 JavaScript的DOM操作可以改变网页内容、结构和样式,我们可以利用DOM操作元素来改变元素里面的内容、属性等
1、改变元素内容 element.innerText
从起始位置到终止位置的内容,但它去除html标签,同时空格和换行也会去掉
也就是不识别html标签
element.innerHTML
起始位置到终止位置的全部内容,包括html标签,同时保留空格和换行
W3C标准
1 2 3 4 5 6 7 8 9 10 11 12 13 14 15 16 17 18 19 20 21 22 23 24 25 26 27 28 29 30 31 32 33 34 35 36 37 38 39 40 41 42 43 44 45 46 47 48 49 <!DOCTYPE html > <html lang ="en" > <head > <meta charset ="UTF-8" > <meta http-equiv ="X-UA-Compatible" content ="IE=edge" > <meta name ="viewport" content ="width=device-width, initial-scale=1.0" > <title > Document</title > <style > div ,p { width : 300px ; height : 30px ; line-height : 30px ; color : #fff ; background-color : pink; } </style > </head > <body > <button > 显示当前系统时间</button > <div > 某个时间</div > <p > 时间</p > <script > var btn = document .querySelector ('button' ); var div = document .querySelector ('div' ); btn.onclick = function ( div.innerText = getDate (); } function getDate ( var date = new Date (); var year = date.getFullYear (); var month = date.getMonth () + 1 ; var dates = date.getDate (); var arr = ['星期日' ,'星期一' ,'星期二' ,'星期三' ,'星期四' ,'星期五' ,'星期六' ]; var day = date.getDay (); return '今天是' + year + '年' + month + '月' + dates + '日' + arr[day]; } var p = document .querySelector ('p' ); p.innerText = getDate (); </script > </body > </html >
2、常用元素的属性操作 1 2 3 4 5 6 7 8 9 10 11 12 13 14 15 16 17 18 19 20 21 22 23 24 25 26 27 28 29 30 31 32 33 34 35 36 37 38 39 40 41 <!DOCTYPE html > <html lang ="en" > <head > <meta charset ="UTF-8" > <meta http-equiv ="X-UA-Compatible" content ="IE=edge" > <meta name ="viewport" content ="width=device-width, initial-scale=1.0" > <title > Document</title > <style > button { width : 50px ; height : 50px ; } img { width : 100ex ; height : 100ex ; } </style > </head > <body > <button id ="e" > 恶</button > <button id ="shan" > 善</button > <img src ="./img/dom-bom/e.jpg" alt ="" title ='恶' > <script > var e = document .getElementById ('e' ); var shan = document .getElementById ('shan' ); var img = document .querySelector ('img' ); e.onclick = function ( img.src = './img/dom-bom/e.jpg' ; img.title = '恶' ; } shan.onclick = function ( img.src = './img/dom-bom/shan.jpg' ; img.title = '善' ; } </script > </body > </html >
3、修改表单属性 利用DOM可以操作如下表单元素的属性:
type、value、checked、selected、disabled
1 2 3 4 5 6 7 8 9 10 11 12 13 14 15 16 17 18 19 20 21 22 23 24 25 26 27 28 <!DOCTYPE html > <html lang ="en" > <head > <meta charset ="UTF-8" > <meta http-equiv ="X-UA-Compatible" content ="IE=edge" > <meta name ="viewport" content ="width=device-width, initial-scale=1.0" > <title > Document</title > </head > <body > <button > 按钮</button > <input type ="text" value ="输入内容" > <script > var btn = document .querySelector ('button' ); var input = document .querySelector ('input' ); btn.onclick = function ( input.value = '被点击了' ; this .disabled = true ; } </script > </body > </html >
显示隐藏密钥明文案例 1 2 3 4 5 6 7 8 9 10 11 12 13 14 15 16 17 18 19 20 21 22 23 24 25 26 27 28 29 30 31 32 33 34 35 36 37 38 39 40 41 42 43 44 45 46 47 48 49 50 51 52 53 54 <!DOCTYPE html > <html lang ="en" > <head > <meta charset ="UTF-8" > <meta http-equiv ="X-UA-Compatible" content ="IE=edge" > <meta name ="viewport" content ="width=device-width, initial-scale=1.0" > <title > Document</title > <style > .box { width : 400px ; border-bottom : 1px solid #ccc ; margin : 100px auto; } .box input { width : 370px ; height : 30px ; border : 0 ; outline : none; } .box img { position : absolute; top : 99px ; right : 800px ; width : 15px ; } </style > </head > <body > <div class ="box" > <label for ="" > <img src ="./img/dom-bom/e.jpg" id ="e" > </label > <input type ="password" name ="" id ="pwd" > </div > <script > var e = document .getElementById ('e' ); var pwd = document .getElementById ('pwd' ); e.onclick = function ( if (pwd.type == 'password' ) { pwd.type = 'text' ; e.src = './img/dom-bom/shan.jpg' ; } else { pwd.type = 'password' ; e.src = './img/dom-bom/e.jpg' ; } } </script > </body > </html >
4、修改样式属性 我们可以通过JS修改元素的大小、颜色、位置等样式
element.style 行内样式操作
element.className 类名样式操作
注意:
1、js里面的样式采取驼峰命名法, 比如 fontSize 、 backgroundColor
2、js修改style 样式操作,产生的是行内样式,css权重比较高
1 2 3 4 5 6 7 8 9 10 11 12 13 14 15 16 17 18 19 20 21 22 23 24 25 26 27 <!DOCTYPE html > <html lang ="en" > <head > <meta charset ="UTF-8" > <meta http-equiv ="X-UA-Compatible" content ="IE=edge" > <meta name ="viewport" content ="width=device-width, initial-scale=1.0" > <title > Document</title > <style > div { width : 200px ; height : 200px ; background-color : pink; } </style > </head > <body > <div > </div > <script > var div = document .querySelector ('div' ); div.onclick = function ( this .style .backgroundColor = 'black' ; this .style .width = '300px' ; this .style .height = '400px' ; } </script > </body > </html >
淘宝关闭二维码案例
1 2 3 4 5 6 7 8 9 10 11 12 13 14 15 16 17 18 19 20 21 22 23 24 25 26 27 28 29 30 31 32 33 34 35 36 37 38 39 40 41 42 43 44 45 46 47 48 49 50 51 52 53 <!DOCTYPE html > <html lang ="en" > <head > <meta charset ="UTF-8" > <meta http-equiv ="X-UA-Compatible" content ="IE=edge" > <meta name ="viewport" content ="width=device-width, initial-scale=1.0" > <title > Document</title > <style > .box { position : relative; width : 74px ; height : 88px ; border : 1px solid #ccc ; margin : 100px auto; font-size : 12px ; text-align : center; color : #f40 ; } .box img { width : 60px ; height : 60px ; margin-top : 5px ; } .close-btn { position : absolute; top : -1px ; left : -16px ; width : 14px ; height : 14px ; border : 1px solid #ccc ; line-height : 14px ; font-family : Arial,Helvetica,sans-serif; cursor : pointer; } </style > </head > <body > <div class ="box" > <img src ="./img/dom-bom/shan.jpg" alt ="" > <i class ="close-btn" > x</i > </div > <script > var btn = document .querySelector ('.close-btn' ); var box = document .querySelector ('.box' ); btn.onclick = function ( box.style .display = 'none' ; } </script > </body > </html >
循环精灵图 1 2 3 4 5 6 7 8 9 10 11 12 13 14 15 16 17 18 19 20 21 22 23 24 25 26 27 28 29 30 31 32 33 34 35 36 37 38 39 40 41 42 43 44 45 46 47 48 49 50 51 52 53 54 55 56 57 58 59 60 61 62 63 <!DOCTYPE html > <html lang ="en" > <head > <meta charset ="UTF-8" > <meta name ="viewport" content ="width=device-width, initial-scale=1.0" > <meta http-equiv ="X-UA-Compatible" content ="ie=edge" > <title > Document</title > <style > * { margin : 0 ; padding : 0 ; } li { list-style-type : none; } .box { width : 250px ; margin : 100px auto; } .box li { float : left; width : 24px ; height : 24px ; background-color : pink; margin : 15px ; background : url (./img/dom-bom/sprite.png ) no-repeat; } </style > </head > <body > <div class ="box" > <ul > <li > </li > <li > </li > <li > </li > <li > </li > <li > </li > <li > </li > <li > </li > <li > </li > <li > </li > <li > </li > <li > </li > <li > </li > </ul > </div > <script > var lis = document .querySelectorAll ('li' ); for (var i = 0 ; i < lis.length ; i++) { var index = i * 44 ; lis[i].style .backgroundPosition = '0 -' + index + 'px' ; } </script > </body > </html >
显示隐藏文本框内容 1 2 3 4 5 6 7 8 9 10 11 12 13 14 15 16 17 18 19 20 21 22 23 24 25 26 27 28 29 30 31 32 33 34 35 36 37 38 39 40 41 42 43 <!DOCTYPE html > <html lang ="en" > <head > <meta charset ="UTF-8" > <meta name ="viewport" content ="width=device-width, initial-scale=1.0" > <meta http-equiv ="X-UA-Compatible" content ="ie=edge" > <title > Document</title > <style > input { color : #999 ; } </style > </head > <body > <input type ="text" value ="手机" > <script > var text = document .querySelector ('input' ); text.onfocus = function ( if (this .value === '手机' ) { this .value = '' ; } this .style .color = '#333' ; } text.onblur = function ( if (this .value === '' ) { this .value = '手机' ; } this .style .color = '#999' ; } </script > </body > </html >
通过className修改元素属性 注意
1、如果修改样式较多,可以采取操作类名方式更改元素样式
2、class因为是保留字,因此使用className来操作元素类名属性
3、className 会直接更改元素的类名,会覆盖原先的类名
1 2 3 4 5 6 7 8 9 10 11 12 13 14 15 16 17 18 19 20 21 22 23 24 25 26 27 28 29 30 31 32 33 34 35 36 37 38 39 40 41 42 43 44 45 46 <!DOCTYPE html > <html lang ="en" > <head > <meta charset ="UTF-8" > <meta name ="viewport" content ="width=device-width, initial-scale=1.0" > <meta http-equiv ="X-UA-Compatible" content ="ie=edge" > <title > Document</title > <style > div { width : 100px ; height : 100px ; background-color : pink; } .change { background-color : purple; color : #fff ; font-size : 25px ; margin-top : 100px ; } </style > </head > <body > <div class ="first" > 文本</div > <script > var test = document .querySelector ('div' ); test.onclick = function ( this .className = 'first change' ; } </script > </body > </html >
密码框验证信息 1 2 3 4 5 6 7 8 9 10 11 12 13 14 15 16 17 18 19 20 21 22 23 24 25 26 27 28 29 30 31 32 33 34 35 36 37 38 39 40 41 42 43 44 45 46 47 48 49 50 51 52 53 54 55 56 57 58 59 60 61 62 63 <!DOCTYPE html > <html lang ="en" > <head > <meta charset ="UTF-8" > <meta name ="viewport" content ="width=device-width, initial-scale=1.0" > <meta http-equiv ="X-UA-Compatible" content ="ie=edge" > <title > Document</title > <style > div { width : 600px ; margin : 100px auto; } .message { display : inline-block; font-size : 12px ; color : #999 ; background : url (./img/dom-bom/mess.png ) no-repeat left center; padding-left : 20px ; } .wrong { color : red; background-image : url (./img/dom-bom/wrong.png ); } .right { color : green; background-image : url (./img/dom-bom/right.png ); } </style > </head > <body > <div class ="register" > <input type ="password" class ="ipt" > <p class ="message" > 请输入6~16位密码</p > </div > <script > var ipt = document .querySelector ('.ipt' ); var message = document .querySelector ('.message' ); ipt.onblur = function ( if (this .value .length < 6 || this .value .length > 16 ) { message.className = 'message wrong' ; message.innerHTML = '您输入的位数不对要求6~16位' ; } else { message.className = 'message right' ; message.innerHTML = '您输入的正确' ; } } </script > </body > </html >
开关灯 1 2 3 4 5 6 7 8 9 10 11 12 13 14 15 16 17 18 19 20 21 22 23 24 25 26 27 28 29 <!DOCTYPE html > <html lang ="en" > <head > <meta charset ="UTF-8" > <meta name ="viewport" content ="width=device-width, initial-scale=1.0" > <meta http-equiv ="X-UA-Compatible" content ="ie=edge" > <title > Document</title > </head > <body > <button id ="btn" > 开关灯</button > <script > var btn = document .getElementById ('btn' ); var flag = 0 ; btn.onclick = function ( if (flag == 0 ) { document .body .style .backgroundColor = 'black' ; flag = 1 ; } else { document .body .style .backgroundColor = '#fff' ; flag = 0 ; } } </script > </body > </html >
操作元素小结
5、排他思想 干掉其他人,再设置自己的样式
1 2 3 4 5 6 7 8 9 10 11 12 13 14 15 16 17 18 19 20 21 22 23 24 25 26 27 28 29 30 31 32 <!DOCTYPE html > <html lang ="en" > <head > <meta charset ="UTF-8" > <meta http-equiv ="X-UA-Compatible" content ="IE=edge" > <meta name ="viewport" content ="width=device-width, initial-scale=1.0" > <title > Document</title > </head > <body > <button > 按钮1</button > <button > 按钮2</button > <button > 按钮3</button > <button > 按钮4</button > <button > 按钮5</button > <script > var btns = document .getElementsByTagName ('button' ); for (var i = 0 ; i < btns.length ; i++) { btns[i].onclick = function ( for (var i = 0 ; i < btns.length ; i++) { btns[i].style .backgroundColor = '' ; } this .style .backgroundColor = 'red' ; } } </script > </body > </html >
6、自定义属性值 1、获取属性值
1 element .getAttribute('属性' );
2、设置属性值
1 element .setAttribute('属性' ,'值' );
3、移除属性 1 element .removeAttribute('属性' );
1 2 3 4 5 6 7 8 9 10 11 12 13 14 15 16 17 18 19 20 21 <body > <div id ="demo" index ="1" class ="nav" > </div > <script > var div = document .querySelector ('div' ); console .log (div.id ); console .log (div.getAttribute ('id' )); console .log (div.getAttribute ('index' )); div.id = 'test' ; div.className = 'navs' ; div.setAttribute ('index' , 2 ); div.setAttribute ('class' , 'footer' ); div.removeAttribute ('index' ); </script > </body >
7、H5自定义属性 目的:
保存并保存数据,有些数据可以保存到页面中而不用保存到数据库中
有些自定义属性很容易引起歧义,不容易判断到底是内置属性还是自定义的,所以H5有了规定
1、设置H5自定义属性 H5规定自定义属性 data-开头作为属性名并赋值
1 2 3 <div data-index = "1" ></>div .setAttribute('data-index' ,1 );
2、 获取H5自定义属性
1 2 3 4 5 6 7 8 9 10 11 12 13 14 15 16 17 18 <body > <div getTime ="20" data-index ="2" data-list-name ="andy" > </div > <script > var div = document .querySelector ('div' ); console .log (div.getAttribute ('getTime' )); div.setAttribute ('data-time' , 20 ); console .log (div.getAttribute ('data-index' )); console .log (div.getAttribute ('data-list-name' )); console .log (div.dataset ); console .log (div.dataset .index ); console .log (div.dataset ['index' ]); console .log (div.dataset .listName ); console .log (div.dataset ['listName' ]); </script > </body >
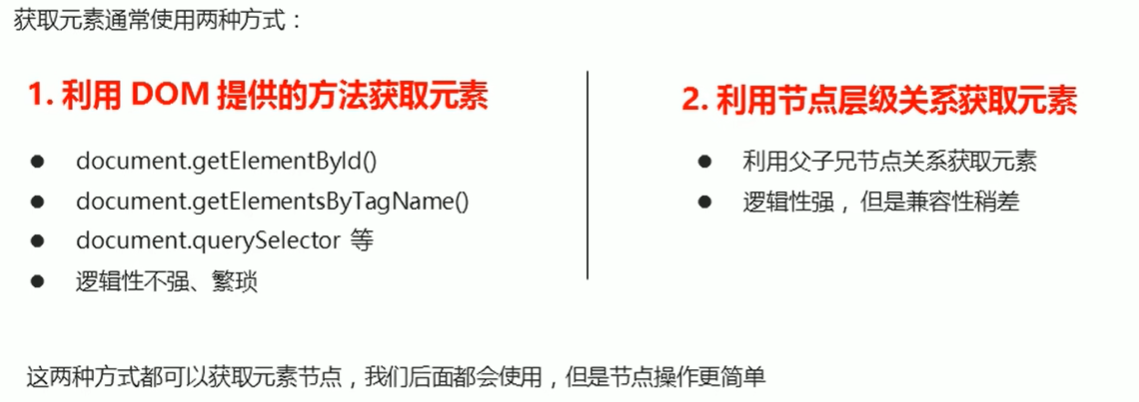
5、节点操作 获取元素通常使用两种方式:
1、节点概述 一般的,节点至少拥有三个基本属性
nodeType:节点类型
nodeName:节点名称
nodeValue:节点值
元素节点nodeType为 1
属性节点nodeType为 2
文本节点nodeType为 3
节点操作主要操作的是元素节点
2、父级节点
parentNode属性可以返回某节点的父结点,注意是最近的一个父结点如果指定的节点没有父结点则返回null
1 2 3 4 5 6 7 8 9 10 11 12 13 14 15 16 17 18 19 20 21 22 23 24 <body > <div > 我是div</div > <span > 我是span</span > <ul > <li > 我是li</li > <li > 我是li</li > <li > 我是li</li > <li > 我是li</li > </ul > <div class ="demo" > <div class ="box" > <span class ="erweima" > ×</span > </div > </div > <script > var erweima = document .querySelector ('.erweima' ); console .log (erweima.parentNode ); </script > </body >
3、子节点 1 parentNode.childNodes(标准)
parentNode.childNodes 返回包含指定节点的子节点的集合,该集合为即时更新的集合返回值包含了所有的子结点,包括元素节点,文本节点等
如果只想要获得里面的元素节点,则需要专门处理。所以我们一般不提倡使用childNodes
1 parentNode.children (非标准)
parentNode.children 是一个只读属性,返回所有的子元素节点它只返回子元素节点,其余节点不返回 (这个是我们重点掌握的 )
虽然 children 是一个非标准,但是得到了各个浏览器的支持,因此我们可以放心使用
1 2 3 4 5 6 7 8 9 10 11 12 13 14 15 16 17 18 19 20 21 22 23 24 25 <body > <ul > <li > 我是li</li > <li > 我是li</li > <li > 我是li</li > <li > 我是li</li > </ul > <ol > <li > 我是li</li > <li > 我是li</li > <li > 我是li</li > <li > 我是li</li > </ol > <script > var ul = document .querySelector ('ul' ); var lis = ul.querySelectorAll ('li' ); console .log (ul.childNodes ); console .log (ul.childNodes [0 ].nodeType ); console .log (ul.childNodes [1 ].nodeType ); console .log (ul.children ); </script > </body >
1、第一个子结点
firstChild 返回第一个子节点,找不到则返回null同样,也是包含所有的节点
2、最后一个子结点
lastChild 返回最后一个子节点,找不到则返回null同样,也是包含所有的节点
1 2 3 4 5 6 7 8 9 10 11 12 13 14 15 16 17 18 19 20 21 <body > <ol > <li > 我是li1</li > <li > 我是li2</li > <li > 我是li3</li > <li > 我是li4</li > <li > 我是li5</li > </ol > <script > var ol = document .querySelector ('ol' ); console .log (ol.firstChild ); console .log (ol.lastChild ); console .log (ol.firstElementChild ); console .log (ol.lastElementChild ); console .log (ol.children [0 ]); console .log (ol.children [ol.children .length - 1 ]); </script > </body >
4、兄弟节点 1、下一个兄弟节点
nextSibling 返回当前元素的下一个兄弟元素节点,找不到则返回null同样,也是包含所有的节点
2、上一个兄弟节点
previousSibling 返回当前元素上一个兄弟元素节点,找不到则返回null同样,也是包含所有的节点
3、下一个兄弟节点(兼容性)
nextElementSibling 返回当前元素下一个兄弟元素节点,找不到则返回null有兼容性问题,IE9才支持
4、上一个兄弟节点(兼容性) 1 node .previousElementSibling
previousElementSibling 返回当前元素上一个兄弟元素节点,找不到则返回null有兼容性问题,IE9才支持
1 2 3 4 5 6 7 8 9 10 11 12 13 <body > <div > 我是div</div > <span > 我是span</span > <script > var div = document .querySelector ('div' ); console .log (div.nextSibling ); console .log (div.previousSibling ); console .log (div.nextElementSibling ); console .log (div.previousElementSibling ); </script > </body >
解决兼容性问题 :自己封装一个兼容性的函数
1 2 3 4 5 6 7 8 9 function getNextElementSibling (element ) {var el = element;while (el = el.nextSibling ) {if (el.nodeType === 1 ){return el;return null ;
5、创建节点 1 document .createElement('tagName' );
document.createElement() 方法创建由 tagName 指定的HTML 元素因为这些元素原先不存在,是根据我们的需求动态生成的,所以我们也称为动态创建元素节点
1、添加节点
node.appendChild() 方法将一个节点添加到指定父节点的子节点列表末尾 。类似于 CSS 里面的 after 伪元素。
1 node.insertBefore(child ,指定元素)
node.insertBefore() 方法将一个节点添加到父节点的指定子节点前面 。类似于 CSS 里面的 before 伪元素。
1 2 3 4 5 6 7 8 9 10 11 12 13 14 15 16 17 <body > <ul > <li > 123</li > </ul > <script > var li = document .createElement ('li' ); var ul = document .querySelector ('ul' ); ul.appendChild (li); var lili = document .createElement ('li' ); ul.insertBefore (lili, ul.children [0 ]); </script > </body >
2、删除节点
node.removeChild()方法从 DOM 中删除一个子节点,返回删除的节点
3、复制节点
node.cloneNode()方法返回调用该方法的节点的一个副本。 也称为克隆节点/拷贝节点如果括号参数为空或者为 false ,则是浅拷贝,即只克隆复制节点本身,不克隆里面的子节点
如果括号参数为 true ,则是深度拷贝,会复制节点本身以及里面所有的子节点
1 2 3 4 5 6 7 8 9 10 11 12 13 14 <body > <ul > <li > 1111</li > <li > 2</li > <li > 3</li > </ul > <script > var ul = document .querySelector ('ul' ); var lili = ul.children [0 ].cloneNode (true ); ul.appendChild (lili); </script > </body >
6、三种动态创建元素的区别
document.write() 是直接将内容写入页面的内容流,但是文档流执行完毕,则它会导致页面全部重绘innerHTML 是将内容写入某个 DOM 节点,不会导致页面全部重绘innerHTML 创建多个元素效率更高(不要拼接字符串,采取数组形式拼接),结构稍微复杂
1 2 3 4 5 6 7 8 9 10 11 12 13 14 15 16 17 18 19 20 21 22 23 <body > <div class ="innner" > </div > <div class ="create" > </div > <script > var inner = document .querySelector ('.inner' ); for (var i = 0 ; i <= 100 ; i++) { inner.innerHTML += '<a href="#">百度</a>' ; } var arr = []; for (var i = 0 ; i <= 100 ; i++) { arr.push ('<a href="#">百度</a>' ); } inner.innerHTML = arr.join ('' ); var create = document .querySelector ('.create' ); var a = document .createElement ('a' ); create.appendChild (a); </script > </body >
6、DOM核心 对于DOM操作,我们主要针对子元素的操作,主要有
创建、增、删、改、查、属性操作、时间操作
1、创建
document.write
innerHTML
createElement
2、增
appendChild
insertBefore
3、删
removeChild
4、改
主要修改dom的元素属性,dom元素的内容、属性、表单的值等
修改元素属性:src、href、title 等
修改普通元素内容:innerHTML、innerText
修改表单元素:value、type、disabled
修改元素样式:style、className
5、查 主要获取查询dom的元素
6、属性操作
setAttribute:设置dom的属性值
getAttribute:得到dom的属性值
removeAttribute:移除属性
7、事件操作
7、事件高级 1、注册事件 给元素添加事件,称为注册事件或者绑定事件。
注册事件有两种方式:传统方式 和方法监听注册方式
传统注册方式
方法监听注册方式
利用on开头的事件onlick
w3c 标准推荐方式
<button onclick = “alert(“hi”)”>
addEventListener() 它是一个方法
btn.onclick = function() {}
IE9 之前的 IE 不支持此方法,可使用 attachEvent() 代替
特点:注册事件的唯一性
特点:同一个元素同一个事件可以注册多个监听器
同一个元素同一个事件只能设置一个处理函数,最后注册的处理函数将会覆盖前面注册的处理函数
按注册顺序依次执行
addEventListener事件监听方式
eventTarget.addEventListener()方法将指定的监听器注册到 eventTarget(目标对象)上当该对象触发指定的事件时,就会执行事件处理函数
1 eventTarget.addEventListener(type ,listener [,useCapture ])
该方法接收三个参数:
type:事件类型字符串,比如click,mouseover,注意这里不要带onlistener:事件处理函数,事件发生时,会调用该监听函数useCapture:可选参数,是一个布尔值,默认是 false。
1 2 3 4 5 6 7 8 9 10 11 12 13 14 15 16 17 18 19 20 21 22 23 24 25 26 27 28 <body > <button > 传统注册事件</button > <button > 方法监听注册事件</button > <button > ie9 attachEvent</button > <script > var btns = document .querySelectorAll ('button' ); btns[0 ].onclick = function ( alert ('hi' ); } btns[0 ].onclick = function ( alert ('hao a u' ); } btns[1 ].addEventListener ('click' , function ( alert (22 ); }) btns[1 ].addEventListener ('click' , function ( alert (33 ); }) btns[2 ].attachEvent ('onclick' , function ( alert (11 ); }) </script > </body >
attachEvent事件监听方式(兼容)
eventTarget.attachEvent()方法将指定的监听器注册到 eventTarget(目标对象) 上当该对象触发指定的事件时,指定的回调函数就会被执行
1 eventTarget.attachEvent(eventNameWithOn ,callback )
该方法接收两个参数:
eventNameWithOn:事件类型字符串,比如 onclick 、onmouseover ,这里要带 oncallback: 事件处理函数,当目标触发事件时回调函数被调用ie9以前的版本支持。但ie已经寄了
2、删除事件 解绑事件
1、removeEventListener删除事件方式 1 eventTarget.removeEventListener(type ,listener [,useCapture ]) ;
该方法接收三个参数:
type:事件类型字符串,比如click,mouseover,注意这里不要带onlistener:事件处理函数,事件发生时,会调用该监听函数useCapture:可选参数,是一个布尔值,默认是 false。
2、detachEvent删除事件方式(兼容) 1 eventTarget.detachEvent(eventNameWithOn ,callback ) ;
该方法接收两个参数:
eventNameWithOn:事件类型字符串,比如 onclick 、onmouseover ,这里要带 oncallback: 事件处理函数,当目标触发事件时回调函数被调用ie9以前的版本支持
3、传统事件删除方式 1 eventTarget.onclick = null
1 2 3 4 5 6 7 8 9 10 11 12 13 14 15 16 17 18 19 20 21 22 23 24 25 26 27 <body > <div > 1</div > <div > 2</div > <div > 3</div > <script > var divs = document .querySelectorAll ('div' ); divs[0 ].onclick = function ( alert (11 ); divs[0 ].onclick = null ; } divs[1 ].addEventListener ('click' ,fn); function fn ( alert (22 ); divs[1 ].removeEventListener ('click' ,fn); } divs[2 ].attachEvent ('onclick' ,fn1); function fn1 ( alert (33 ); divs[2 ].detachEvent ('onclick' ,fn1); } </script > </body >
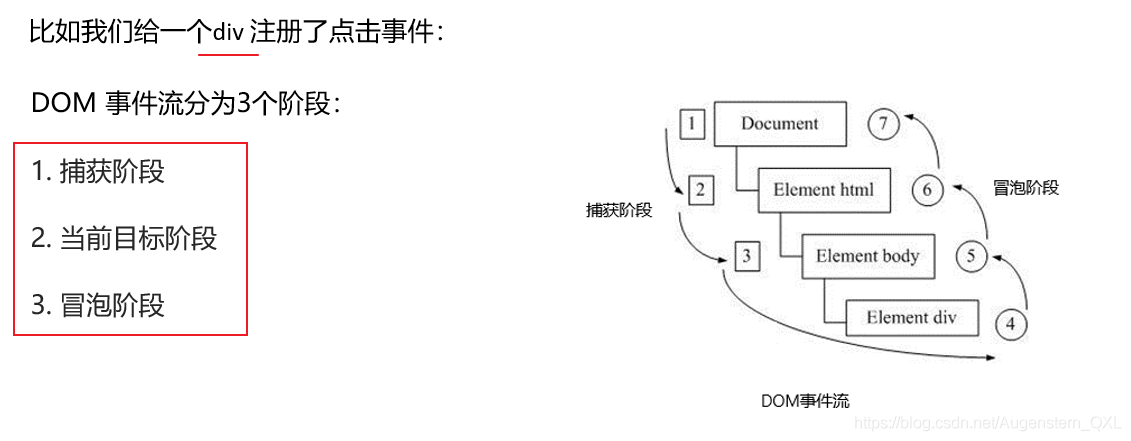
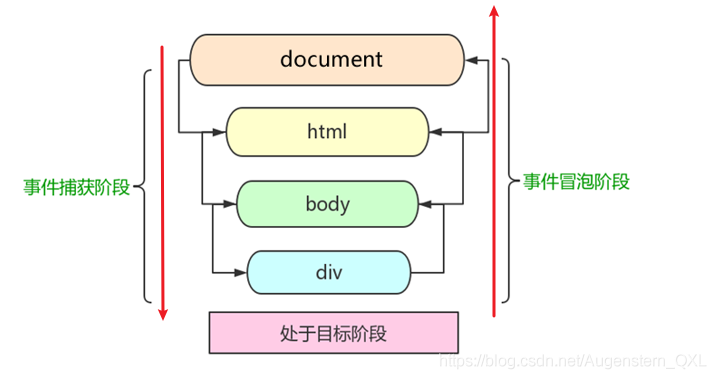
3、DOM事件流 事件流描述的是从页面中接收事件的顺序
事件冒泡: IE 最早提出,事件开始时由最具体的元素接收,然后逐级向上传播到到 DOM 最顶层节点的过程。
事件捕获: 网景最早提出,由 DOM 最顶层节点开始,然后逐级向下传播到到最具体的元素接收的过程。
加深理解 :
我们向水里面扔一块石头,首先它会有一个下降的过程,这个过程就可以理解为从最顶层向事件发生的最具体元素(目标点)的捕获过程;之后会产生泡泡,会在最低点( 最具体元素)之后漂浮到水面上,这个过程相当于事件冒泡。
1、捕获阶段
document -> html -> body -> father -> son
两个盒子嵌套,一个父盒子一个子盒子,我们的需求是当点击父盒子时弹出 father ,当点击子盒子时弹出 son
1 2 3 4 5 6 7 8 9 10 11 12 13 14 15 16 17 18 19 <body > <div class ="father" > <div class ="son" > son盒子</div > </div > <script > var son = document .querySelector ('.son' ); son.addEventListener ('click' , function ( alert ('son' ); }, true ); var father = document .querySelector ('.father' ); father.addEventListener ('click' , function ( alert ('father' ); }, true ); </script > </body >
这是因为捕获阶段由 DOM 最顶层节点开始,然后逐级向下传播到到最具体的元素接收
document -> html -> body -> father -> son
先看 document 的事件,没有;再看 html 的事件,没有;再看 body 的事件,没有;再看 father 的事件,有就先执行;再看 son 的事件,再执行。
2、冒泡阶段
son -> father ->body -> html -> document
1 2 3 4 5 6 7 8 9 10 11 12 13 14 15 16 17 18 19 <body > <div class ="father" > <div class ="son" > son盒子</div > </div > <script > var son = document .querySelector ('.son' ); son.addEventListener ('click' , function ( alert ('son' ); }, false ); var father = document .querySelector ('.father' ); father.addEventListener ('click' , function ( alert ('father' ); }, false ); document .addEventListener ('click' , function ( alert ('document' ); }) </script > </body >
这是因为冒泡阶段开始时由最具体的元素接收,然后逐级向上传播到到 DOM 最顶层节点
son -> father ->body -> html -> document
3、小结
JS 代码中只能执行捕获或者冒泡其中的一个阶段
onclick 和 attachEvent只能得到冒泡阶段addEventListener(type,listener[,useCapture])第三个参数如果是 true,表示在事件捕获阶段调用事件处理程序;如果是 false (不写默认就是false),表示在事件冒泡阶段调用事件处理程序实际开发中我们很少使用事件捕获,我们更关注事件冒泡。 有些事件是没有冒泡的,比如 onblur、onfocus、onmouseenter、onmouseleave
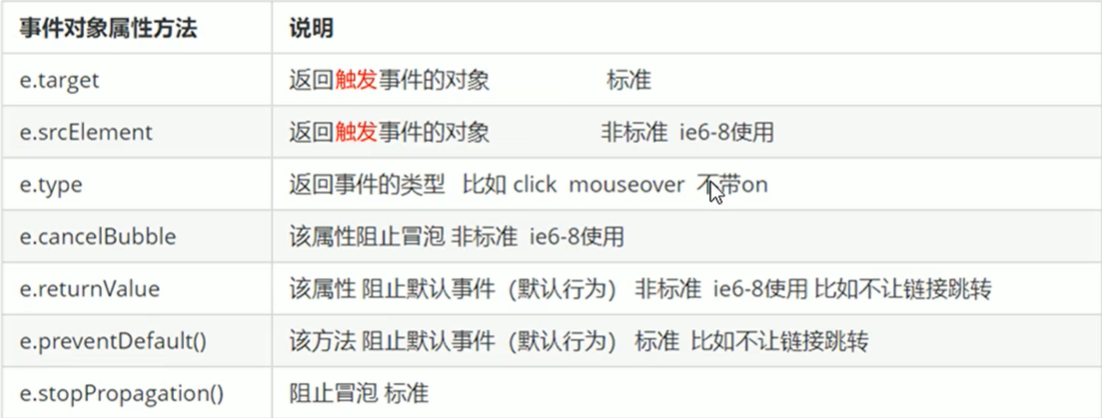
4、事件对象 1 2 3 4 5 6 eventTarget.onclick = function (event ) {addEventListener ('click' , function (event ) {
官方解释:event 对象代表事件的状态,比如键盘按键的状态、鼠标的位置、鼠标按钮的状态
简单理解:
事件发生后,跟事件相关的一系列信息数据的集合都放到这个对象里面
这个对象就是事件对象 event,它有很多属性和方法,比如“
谁绑定了这个事件
鼠标触发事件的话,会得到鼠标的相关信息,如鼠标位置
键盘触发事件的话,会得到键盘的相关信息,如按了哪个键
这个 event 是个形参,系统帮我们设定为事件对象,不需要传递实参过去
当我们注册事件时, event 对象就会被系统自动创建,并依次传递给事件监听器(事件处理函数)
1 2 3 4 5 6 7 8 9 10 11 12 13 14 15 16 17 18 19 20 <body><div > 123</div > <script > var div = document .querySelector ('div' ); div.onclick = function (e ) { console .log (e); } </script >
1、事件对象的常见属性和方法
e.target 和 this 的区别:
this 是事件绑定的元素, 这个函数的调用者(绑定这个事件的元素)
e.target 是事件触发的元素。
2、事件对象阻止默认行为 1 2 3 4 5 6 7 8 9 10 11 12 13 14 15 16 17 18 19 20 21 22 23 24 25 26 27 28 29 30 31 32 33 34 35 <body > <div > 123</div > <a href ="http://www.baidu.com" > 百度</a > <form action ="http://www.baidu.com" > <input type ="submit" value ="提交" name ="sub" > </form > <script > var div = document .querySelector ('div' ); div.addEventListener ('click' , fn); div.addEventListener ('mouseover' , fn); div.addEventListener ('mouseout' , fn); function fn (e ) { console .log (e.type ); } var a = document .querySelector ('a' ); a.addEventListener ('click' , function (e ) { e.preventDefault (); }) a.onclick = function (e ) { return false ; alert (11 ); } </script > </body >
3、阻止事件冒泡 事件冒泡:开始时由最具体的元素接收,然后逐级向上传播到到 DOM 最顶层节点
事件冒泡本身的特性,会带来的坏处,也会带来的好处,需要我们灵活掌握。
1 2 3 4 5 6 7 8 9 10 11 12 13 14 15 16 17 18 19 20 21 22 23 <body > <div class ="father" > <div class ="son" > son儿子</div > </div > <script > var son = document .querySelector ('.son' ); son.addEventListener ('click' , function (e ) { alert ('son' ); e.stopPropagation (); e.cancelBubble = true ; }, false ); var father = document .querySelector ('.father' ); father.addEventListener ('click' , function ( alert ('father' ); }, false ); document .addEventListener ('click' , function ( alert ('document' ); }) </script > </body >
4、事件委托
1 2 3 4 5 6 7 8 9 10 11 12 13 14 15 16 17 18 19 <body > <ul > <li > 知否知否,点我应有弹框在手!</li > <li > 知否知否,点我应有弹框在手!</li > <li > 知否知否,点我应有弹框在手!</li > <li > 知否知否,点我应有弹框在手!</li > <li > 知否知否,点我应有弹框在手!</li > </ul > <script > var ul = document .querySelector ('ul' ); ul.addEventListener ('click' , function (e ) { e.target .style .backgroundColor = 'pink' ; }) </script > </body >
以上案例:给 ul 注册点击事件,然后利用事件对象的 target 来找到当前点击的 li,因为点击 li,事件会冒泡到 ul 上, ul 有注册事件,就会触发事件监听器。
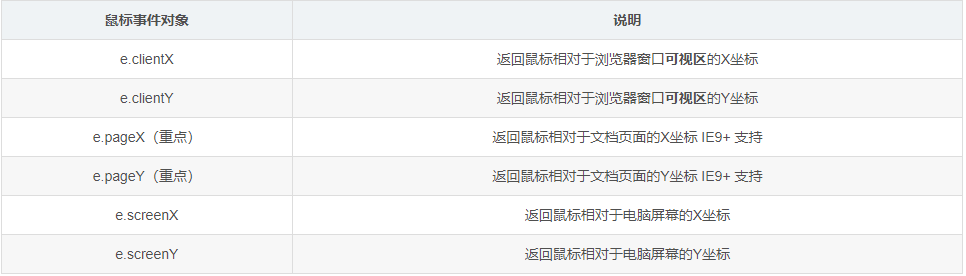
5、鼠标事件
1、禁止鼠标右键与鼠标选中
1 2 3 4 5 6 7 8 9 10 11 12 13 14 <body > <h1 > 我是一段不愿意分享的文字</h1 > <script > document .addEventListener ('contextmenu' , function (e ) { e.preventDefault (); }) document .addEventListener ('selectstart' , function (e ) { e.preventDefault (); }) </script > </body >
2、鼠标事件对象
1 2 3 4 5 6 7 8 9 10 11 12 13 14 15 16 17 18 19 20 21 <body > <script > document .addEventListener ('click' , function (e ) { console .log (e.clientX ); console .log (e.clientY ); console .log ('---------------------' ); console .log (e.pageX ); console .log (e.pageY ); console .log ('---------------------' ); console .log (e.screenX ); console .log (e.screenY ); }) </script > </body >
6、键盘事件
键盘事件对象 属性
说明
keyCode
返回该键 值的ASCII值
onkeydown和 onkeyup 不区分字母大小写,onkeypress 区分字母大小写。
我们实际开发中,我们更多的使用keydown和keyup, 它能识别所有的键(包括功能键)
Keypress 不识别功能键,但是keyCode属性能区分大小写,返回不同的ASCII值
1 2 3 4 5 6 7 8 9 10 11 12 13 14 15 16 17 18 19 20 <body > <script > document .addEventListener ('keyup' , function (e ) { console .log ('up:' + e.keyCode ); if (e.keyCode === 65 ) { alert ('您按下的a键' ); } else { alert ('您没有按下a键' ) } }) document .addEventListener ('keypress' , function (e ) { console .log ('press:' + e.keyCode ); }) </script > </body >
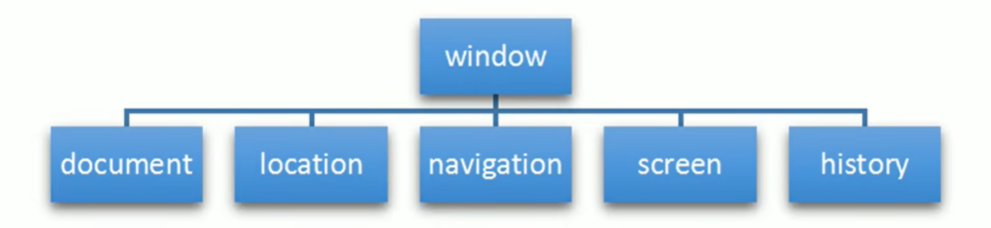
BOM 1、简介
BOM = Browser Object Model 👉浏览器对象模型
它提供了独立于内容而与浏览器窗口进行交互的对象,其核心对象是 window
BOM 由一系列相关的对象构成,并且每个对象都提供了很多方法与属性
BOM 缺乏标准,JavaScript 语法的标准化组织是 ECMA, DOM 的标准化组织是 W3C, BOM最初是Netscape 浏览器标准的一部分
DOM
BOM
文档对象模型
浏览器对象模型
DOM 就是把 文档 当作一个对象来看待
把 浏览器当作一个对象来看待
DOM 的顶级对象是 document
BOM 的顶级对象是 window
DOM 主要学习的是操作页面元素
BOM 学习的是浏览器窗口交互的一些对象
DOM 是 W3C 标准规范
BOM 是浏览器厂商在各自浏览器上定义的,兼容性较差
1、BOM的构成
BOM 比 DOM 更大。它包含 DOM。
window 对象是浏览器的顶级对象,它具有双重角色
它是 JS 访问浏览器窗口的一个接口
它是一个全局对象 。定义在全局作用域中的变量、函数都会变成 window 对象的属性和方法
在调用的时候可以省略 window,前面学习的对话框都属于 window 对象方法,如 alert()、prompt()等。
注意 :window下的一个特殊属性 window.name
1 2 3 4 5 6 7 8 9 10 11 12 13 14 var num = 10 ;console .log (window .num );function fn (console .log (11 );console .fn ();var name = 10 ; console .log (window .num );
2、window对象的常见事件 1、窗口加载事件 window.onload是窗口(页面)加载事件,当文档内容完全加载完成会触发该事件(包括图像,脚本文件,CSS文件等),就调用的处理函数
1 2 3 4 5 6 window .onload = function (window .addEventListener ("load" ,function (
有了window.onload就可以把JS代码写到页面元素的上方
因为onload是等页面内容全部加载完毕,再去执行处理函数
window.onload 传统注册事件方式,只能写一次
如果有多个,会以最后一个window.onload为准
如果使用addEventListener 则没有限制
1 document .addEventListener ('DOMContentLoaded' ,function (
接收两个参数:
DOMCountentLoaded事件触发时,仅当DOM加载完成,不包括样式表,图片,flash等等
如果页面的图片很多的话, 从用户访问到onload触发可能需要较长的时间
交互效果就不能实现,必然影响用户的体验,此时用 DOMContentLoaded事件比较合适。
二者区别
load等页面内容全部加载完毕,包括页面dom元素,图片,flash,css等DOMContentLoaded 是DOM加载完毕,不包含图片 flash css 等就可以执行,加载速度比load更快一些
1 2 3 4 5 6 7 8 9 10 11 12 13 14 15 16 17 18 19 20 21 22 23 24 25 26 27 <script > window .addEventListener ('load' , function ( var btn = document .querySelector ('button' ); btn.addEventListener ('click' , function ( alert ('点击我' ); }) }) window .addEventListener ('load' , function ( alert (22 ); }) document .addEventListener ('DOMContentLoaded' , function ( alert (33 ); }) </script >
2、调整窗口大小事件 window.onresize 是调整窗口大小加载事件,当触发时就调用的处理函数
1 2 3 4 window .onresize = function (window .addEventListener ('resize' ,function (
只要窗口大小发生像素变化,就会触发这个事件
我们经常利用这个事件完成响应式布局。window.innerWidth 当前屏幕的宽度
1 2 3 4 5 6 7 8 9 10 11 12 13 14 15 16 17 18 19 <body > <script > window .addEventListener ('load' , function ( var div = document .querySelector ('div' ); window .addEventListener ('resize' , function ( console .log (window .innerWidth ); console .log ('变化了' ); if (window .innerWidth <= 800 ) { div.style .display = 'none' ; } else { div.style .display = 'block' ; } }) }) </script > <div > </div > </body >
3、定时器 window 对象给我们提供了两个定时器
setTimeout()setInterval()
1、setTimeout()定时器 setTimeout()方法用于设置一个定时器,该定时器在定时器到期后执行调用函数。
1 window .setTimeout (调用函数,[延迟的毫秒数]);
注意 :
window可以省略
这个调用函数
可以直接写函数
或者写函数名
或者采取字符串 ‘函数名()’ (不推荐)
延迟的毫秒数省略默认是0,如果写,必须是毫秒
因为定时器可能有很多,所以我们经常给定时器赋值一个标识符
setTimeout() 这个调用函数我们也称为回调函数 callback
普通函数是按照代码顺序直接调用,而这个函数,需要等待事件,事件到了才会去调用这个函数,因此称为回调函数。
1 2 3 4 5 6 7 8 9 10 11 12 13 14 15 16 17 18 19 20 21 <body > <script > function callback ( console .log ('爆炸了' ); } var timer1 = setTimeout (callback, 3000 ); var timer2 = setTimeout (callback, 5000 ); </script > </body >
2、clearTimeout()停止定时器
clearTimeout()方法取消了先前通过调用 setTimeout()建立的定时器
1 window .clearTimeout (timeoutID)
注意 :
window可以省略里面的参数就是定时器的标识符
1 2 3 4 5 6 7 8 9 10 11 12 <body > <button > 点击停止定时器</button > <script > var btn = document .querySelector ('button' ); var timer = setTimeout (function ( console .log ('爆炸了' ); }, 5000 ); btn.addEventListener ('click' , function ( clearTimeout (timer); }) </script > </body >
3、setInterval()定时器
setInterval()方法重复调用一个函数,每隔这个时间,就去调用一次回调函数
1 window .setInterval (回调函数,[间隔的毫秒数]);
1 2 3 4 5 6 7 8 9 10 11 12 <body > <script > setInterval (function ( console .log ('继续输出' ); }, 1000 ); </script > </body >
4、clearInterval()停止定时器
clearInterval ( ) 方法取消了先前通过调用 setInterval() 建立的定时器
注意:
window可以省略里面的参数就是定时器的标识符
1 2 3 4 5 6 7 8 9 10 11 12 13 14 15 16 17 18 <body > <button class ="begin" > 开启定时器</button > <button class ="stop" > 停止定时器</button > <script > var begin = document .querySelector ('.begin' ); var stop = document .querySelector ('.stop' ); var timer = null ; begin.addEventListener ('click' , function ( timer = setInterval (function ( console .log ('ni hao ma' ); }, 1000 ); }) stop.addEventListener ('click' , function ( clearInterval (timer); }) </script > </body >
5、this指向
this的指向在函数定义的时候是确定不了的,只有函数执行的时候才能确定this到底指向谁
this指向:
全局作用域或者普通函数中this指向全局对象window(注意定时器里面的this指向window)
方法调用中谁调用this指向谁
构造函数中this指向构造函数实例
1 2 3 4 5 6 7 8 9 10 11 12 13 14 15 16 17 18 19 20 21 22 23 24 25 26 27 28 29 30 31 32 33 34 35 36 37 38 39 40 41 42 <body > <button > 点击</button > <script > console .log (this ); function fn ( console .log (this ); } window .fn (); window .setTimeout (function ( console .log (this ); }, 1000 ); var o = { sayHi : function ( console .log (this ); } } o.sayHi (); var btn = document .querySelector ('button' ); btn.addEventListener ('click' , function ( console .log (this ); }) function Fun ( console .log (this ); } var fun = new Fun (); </script > </body >
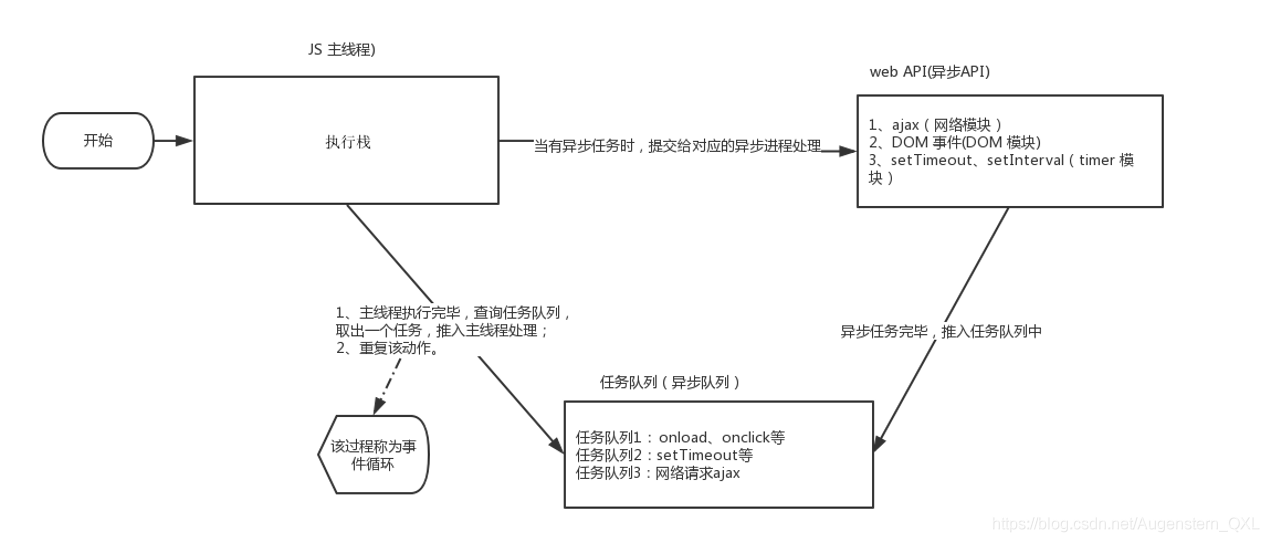
4、JS指向机制 1、Js是单线程
JavaScript 语言的一大特点就是单线程,也就是说,同一个时间只能做一件事。这是因为 Javascript 这门脚本语言诞生的使命所致——JavaScript 是为处理页面中用户的交互,以及操作 DOM 而诞生的。比如我们对某个 DOM 元素进行添加和删除操作,不能同时进行。 应该先进行添加,之后再删除。
单线程就意味着,所有任务需要排队,前一个任务结束,才会执行后一个任务。这样所导致的问题是: 如果 JS 执行的时间过长,这样就会造成页面的渲染不连贯,导致页面渲染加载阻塞的感觉。
2、同步和异步
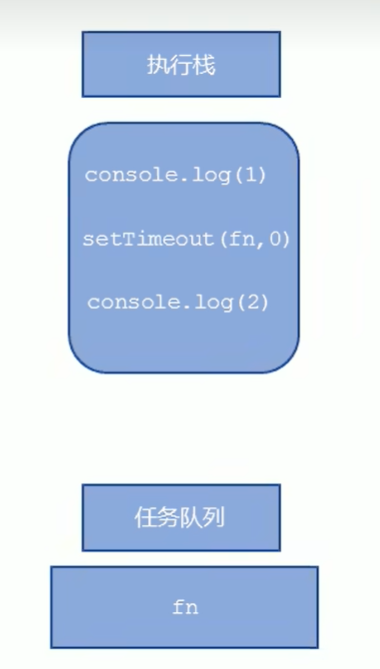
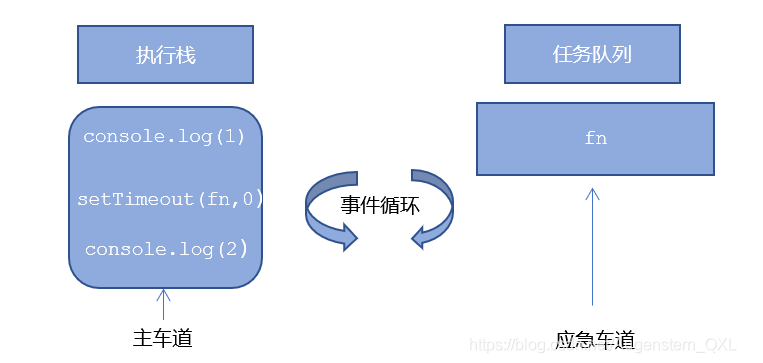
执行机制
先执行执行栈中的同步 任务
异步任务 (回调函数)放入任务队列中一旦执行栈中的所有同步任务执行完毕,系统就会按次序读取 任务队列中的异步任务,于是被读取的异步任务结束等待状态 ,进入执行栈 ,开始执行
1 2 3 4 5 6 7 8 console .log (1 );document .onclick = function (console .log ('click' );console .log (2 );setTimeout (function (console .log (3 )3000 )
执行结果为1、2、3,如果点击了屏幕,那么久根据时间关系,在3秒内点击就click显示在3之前,在3秒后点击click就显示在3之后
同步任务放在执行栈中执行,异步任务由异步进程处理放到任务队列中,执行栈中的任务执行完毕会去任务队列中查看是否有异步任务执行,由于主线程不断的重复获得任务、执行任务、再获取任务、再执行,所以这种机制被称为事件循环 ( event loop)。
5、location对象
window 对象给我们提供了一个 location属性用于获取或者设置窗体的url,并且可以解析url。因为这个属性返回的是一个对象,所以我们将这个属性也称为 location 对象。
1、url 统一资源定位符(uniform resouce locator,URL)是互联网上标准资源的地址。互联网上的每个文件都有一个唯一的 URL,它包含的信息指出文件的位置以及浏览器应该怎么处理它。
url 的一般语法格式为:
组成
说明
protocol
通信协议 常用的http,ftp,maito等
host
主机(域名) www.itheima.com
port
端口号,可选
path
路径 由零或多个'/'符号隔开的字符串
query
参数 以键值对的形式,通过&符号分隔开来
fragment
片段 #后面内容 常见于链接 锚点
2、location对象属性
location对象属性
返回值
location.href 获取或者设置整个URL
location.host
返回主机(域名)www.baidu.com
location.port
返回端口号,如果未写返回空字符串
location.pathname
返回路径
location.search 返回参数
location.hash
返回片段 #后面内容常见于链接 锚点
5s之后跳转页面
1 2 3 4 5 6 7 8 9 10 11 12 13 14 15 16 17 18 <body > <button > 点击</button > <div > </div > <script > var btn = document .querySelector ('button' ); var div = document .querySelector ('div' ); var timer = 5 ; setInterval (function ( if (timer == 0 ) { location.href = 'http://www.itcast.cn' ; } else { div.innerHTML = '您将在' + timer + '秒钟之后跳转到首页' ; timer--; } }, 1000 ); </script > </body >
3、location对象方法
location对象方法
返回值
location.assign()
跟href一样,可以跳转页面(也称为重定向页面)
location.replace()
替换当前页面,因为不记录历史,所以不能后退页面
location.reload()
重新加载页面,相当于刷新按钮或者 f5 ,如果参数为true 强制刷新 ctrl+f5
1 2 3 4 5 6 7 8 9 10 11 12 13 <body > <button > 点击</button > <script > var btn = document .querySelector ('button' ); btn.addEventListener ('click' , function ( location.reload (true ); }) </script > </body >
6、navigator对象
navigator 对象包含有关浏览器的信息,它有很多属性
我们常用的是userAgent,该属性可以返回由客户机发送服务器的user-agent头部的值
下面前端代码可以判断用户是用哪个终端打开页面的,如果是用 PC 打开的,我们就跳转到 PC 端的页面,如果是用手机打开的,就跳转到手机端页面
1 2 3 4 5 if ((navigator.userAgent .match (/(phone|pad|pod|iPhone|iPod|ios|iPad|Android|Mobile|BlackBerry|IEMobile|MQQBrowser|JUC|Fennec|wOSBrowser|BrowserNG|WebOS|Symbian|Windows Phone)/i ))) {window .location .href = "" ; else {window .location .href = "" ;
7、history对象
window 对象给我们提供了一个 history 对象,与浏览器历史记录进行交互
该对象包含用户(在浏览器窗口中)访问过的 URL。
history对象方法
作用
back()
可以后退功能
forward()
前进功能
go(参数)
前进后退功能,参数如果是 1 前进1个页面 如果是 -1 后退1个页面
1 2 3 4 5 6 7 8 9 10 11 <body > <a href ="list.html" > 点击我去往列表页</a > <button > 前进</button > <script > var btn = document .querySelector ('button' ); btn.addEventListener ('click' , function ( history.go (1 ); }) </script > </body >